https://www.ibm.com/developerworks/community/groups/service/html/communityview?communityUuid=e25892f0-20f7-46ff-bbe9-c7c03fb3036f#fullpageWidgetId=Wb33da0c91d92_4cec_a8a7_57df877f617b&file=9ff971b9-237a-4713-a944-c1e322efff78
Friday, July 18, 2014
Upgrade Service Request Manager 7.1 to 7.2.1
http://pic.dhe.ibm.com/infocenter/tivihelp/v32r1/index.jsp?topic=%2Fcom.ibm.srm.doc_721%2Fupgrade%2Fc_upgrade_71to7201.html
Wednesday, July 16, 2014
Why Service Level Agreements (SLAs) are not being applied
when you configure SLAs with commitments and try to apply them, only to get the message: "BMXAQ0090E - No service level agreement was found." This message might be displayed for one of the following reasons:
-
The SLA status is DRAFT or not ACTIVE.

-
The dates that have been entered are not valid, for example, they may be in the past.

-
The SLA has different conditions to the work order or ticket.

-
The SLA has a different location to the work order, ticket, or asset and configuration items.


-
The SLA organization and site does not match with the work order or ticket organization and site.

-
The SLA has different shifts than the work order or ticket.

- The date specified in the SLA is a non-working day.
Configuring Service Level Agreements (SLAs)
The setup of your calendars and shifts plays an important part in calculating the target dates for SLA.


Now that you know how to apply it let's see if the dates are being calculated correctly.
Let's create a calendar first.
-
In the Calendar application, create a calendar.
-
In the Calendar field, enter 2013.
-
From the Select Action menu, select Define/Apply Shifts.
-
In the Define/Apply Shifts window, click New Row.
-
Enter the name WORK for the shift name.
-
Specify
that the shift lasts from Monday to Friday, 08:00 to 17:00. There are 8
hours in the work shift and a one hour lunch break.
Now, create the SLA:
- From the Service Level Agreement application, click New SLA.
- In the SLA field, specify SLA_SR.
- In the Applies To field, specify Service Requests.
-
Create commitments for the service level agreement
- In the Commitments table window, click New Row.
- In the Type field enter RESPONSE
- In the Value field, enter 4. This is the target start time.
- In the Unit of Measure field, enter HOURS.
-
Create another commitment.
- In the Commitments table window, click New Row.
- In the Type field enter RESOLUTION
- In the Value field, enter 32 hours. This is the target finish time.
- In the Unit of Measure field, enter HOURS.
Notice
that if the SR has an associated asset, we want to use the asset's
calendar to calculate the dates and not the SLA default calculation
calendar (this options is only enabled by IBM Maximo for Service
Providers).
Now, let's see how it works on a service request. The details of the service request are as follows:
-
Asset: ASSET_TEST (uses DAY calendar, with a 07:00~15:00 shift, 8 work-hours, Mon~Fri)
-
Reported Date: 25/Oct/13 12:30 (Friday)
In the service request, we select the Apply SLA action, and the following message is shown:
We want the SLA to use the asset's calendar to calculate the target dates as first option.
RESPONSE
= Reported Date + 4 hours. Using the asset's calendar (shifts end at
15:00), we have only 2:30 hours left for the day. So, we should carry
1:30 to the next working day. The result: Target start date = 28/Oct/13
08:30 (Monday).
RESOLUTION
= Reported Date + 32 hours. Again using the asset's calendar (8-hour
shift), we have to add 4 working days to the reported day. The result:
Target finish date = 31/Oct/13 12:30 (Thursday).
So far, so good.
Now let's try a service request, without an asset.
SR:
-
Reported Date: 25/Oct/13 12:30 (Friday)
As the SR doesn't have an asset, the SLA should use the default calculation calendar to calculate the dates (WORK calendar).
So we have:
-
Target start date = 25/Oct/13 16:30
-
Target finish date = 31/Oct/13 08:30
Note that the target finish date isn't 31/Oct/13 12:30, but 31/Oct/13 08:30.
That's
because the shift is from 08:00 to 17:00, having a total of 9 hours.
Even though the shift is set as 8 working hours, we have no information
about this 1 hour break. So the SLA considers just the start/end time of
the shift to make the date calculation. Any value added to work hours won't be considered by SLA calculations.
For holidays, you should use the Apply non-working days action on the calendar. It won't work if you just use 0 (zero) work hours for that particular day (same for weekends).
Maximo server crashes when fetching large number of records
Problem(Abstract)
Maximo7.5 server crashes with Out Of Memory exceptions when fetching a large number of records from SQL Server.
Symptom
When fetching a large number of records ( eg:
around a million ) , the Maximo server freezes and eventually crashes
and one can see Out of Memory exceptions and SQL Server jdbc exceptions
in the application server logs.
This has so far been reported from Maximo 7.5 environments using SQL Server only.
Cause
This is caused by the way the new SQL Server jdbc driver used in Maximo 7.5 handles the records fetched from the database.
Resolving the problem
There is an APAR created for this issue - APAR IV12954. Please contact IBM Support for a
solution.
Source : http://www-01.ibm.com/support/docview.wss?uid=swg21592711
Installing Maximo 7.5 on Windows server 2012
While installing Maximo 7.5 on Windows server 2012 you might want to
look at the provided link to a technote with some helpful information
http
http
Adding a toolbar button in an Application for an Automation Script
This will show you how to add a toolbar button for an Automation
script. I have included a “dummy” script that does not do much,
it is just to show you how to add a toolbar button to an application.
Create the script.
First go to Automation Scripting and create a new Action Launch Point.
For this purpose, I called my Launch Point MYSCRIPT and left the Action to MYSCRIPT as well.
Notice that I picked ASSET for my object, I plan to add this button to
the Asset Application. I then select a name for my actual script,
I just left it as MYSCRIPT but changed the debug level to DEBUG.
Add your code to the next dialog box and create the Launch Point. If
you do not have a code to test with, here is a piece of code that print
some
Work Orders in the log,
from psdi.server import MXServer from java.text import SimpleDateFormat sdf = SimpleDateFormat fmt_out = sdf('yyyy-MM-dd HH:mm') whereClause = "wonum in ('1000', '1001', '1002')" mboMainSet = MXServer .get MXSe rver ().g etMb oSet ("wo rkor der" , MXSe rver .get MXSe rver ().g etSy stem User Info ()) mboM ainS et.s etWh ere( wher eCla use) mboMainSet.reset() mainCount = 0 print "Running Automation Script." while mboM ainS et.g etMb o(ma inCo unt) is not None: myMbo = mboM ainS et.g etMb o(ma inCo unt) mainCount = mainCount + 1 print "Work Order: " + myMb o.ge tStr ing( "won um") + " " + myMb o.ge tStr ing( "des crip tion ") print "Status: " + myMb o.ge tStr ing( "sta tus" ) + " " + fmt_ out. form at(m yMbo .get Date ("st atus date ") )
This script shows you how to get a Mbo set from any object in Maximo
and also how to format a date in case you want a specific date format.
Add toolbar button to application
Go to Application Designer and bring up the Asset Application, bring up
the Add/Modify Signature Options dialog box from the Select Action
menu.
Click new row. Add your Action, make sure you expand the Advanced section and select the “Action” option.
Bring up the Add/Modify Toolbar Menu dialog box from the Select Action
menu. Click new row. Add your new Signature Security Option,
In this case, Tabs were chosen to be MAIN, if you want to be able to run the report from any tab, set it to ALL.
Enable toolbar button in Security Groups
Go to Security Groups and find your group that will be using this toolbar button, I used MAXADMIN in my demo database.
Bring up the Asset application and find “Run my script” and check it.
Save, sign out and sign in again with a user belonging to your group.
The icon will appear as a running man in the toolbar, right next to
create report.
Enable logging for the script
Clicking the Run My Script button does not do much since we set the Log
level to DEBUG. If you want to see the output in the log,
either change the logging level for Autoscript to DEBUG or change the
script log level to INFO. I chose to enable the DEBUG logging,
Set the Log Level to DEBUG, save and Apply Settings, the next time you
run the script you should see something like this in the log,
Hide classifications so they can no longer be seen by users
1) Go To Database Configuration
2) Add
a field to classstructure to mark a Classification as obso
3) Go to the Application Designer.
4) Open the Classifications application and add field called Inactive:
5)Go to the Conditional Expression Manager application.
6) Create a conditional expression to hide a classification marked as Inactive:
7) Go To the security groups application and create a new Global Data Restriction so all users are only allowed to retrieve
classifications
that are not marked as inactive.
Note: if you only wanted this to apply to certain security groups, you could add this restriction as a data restriction for specific security groups in the Security Group application.
Also, you can choose to fill in the Application field or not. If you do not fill this field in, the restriction will apply to all applications, but if you specify an application, the restriction will only apply to the specific application:
8) Go to the Classifications Application and mark a classification as Inactive:
9) The classification is no longer available for selection in the Classify dialog:
VMMSYNC workings and how to look at debug logs.
QUICK OVERVIEW
VMMSYNC is a crontask provided within Maximo products. As with all crontasks it can be set to run at regular intervals. The crontask makes contact with a component of WebSphere called VMM (Virtual Member Manager) via API calls. The calls will be actioned against a federated repository and will request information on users, groups and group assignments from within the federated repository. The information must previously have been populated into the Federated Repository from LDAP(s). VMMSYNC can only be used with WebSphere as it talks directly to VMM which is a security component of WebSphere.WebLogic users will need to use LDAPSYNC which gets its information directly from a single LDAP.
VMMSYNC is a ‘ONE WAY’ synchronisation
i.e. If you delete a user in Maximo, the LDAP will not be updated to remove the user.
LDAP = Lightweight Directory Access protocol
Using an LDAP product allows users to authenticate against a central security product rather than authenticating internally within an application (e.g. Maximo)
Maximo supports 2 LDAP products – Others may work but are not officially supported.
Microsoft Active Directory (MSAD)
Tivoli Directory Server (TDS)
When Maximo makes use of LDAP, only authentication (userid/password check) happens against the LDAP. Users authorisations to individual Maximo applications / actions etc after they have authenticated (logged in) are based on information in the group related tables within Maximo.
When using LDAP for authentication, the user related tables still need to be popu
So, the first thing to realise is.......If a user cannot be seen within WebSpheres Federated Repository then VMMSYNC will not be able to populate their information to Maximo. Check you can see the user in WebSphere before wasting time troubleshooting VMMSYNC. If you cannot see them, then your problem is not with VMMSYNC, but with populating the federated repository.
The Crontask
VMMYNC is a Maximo CRONTASK.
You can have multiple ‘instances’ of the crontask.
The following are the main parameters to set up for the crontask instance.
1.1. Principal - The user used to access VMM/WebSphere e.g. cn=w
2.2. Credential – Password for principal
3.3. Usermapping – Update basedn in the xml to point to starting point in LDAP for user sync e.g. base
asedVMMSYNC is a crontask provided within Maximo products. As with all crontasks it can be set to run at regular intervals. The crontask makes contact with a component of WebSphere called VMM (Virtual Member Manager) via API calls. The calls will be actioned against a federated repository and will request information on users, groups and group assignments from within the federated repository. The information must previously have been populated into the Federated Repository from LDAP(s). VMMSYNC can only be used with WebSphere as it talks directly to VMM which is a security component of WebSphere.WebLogic users will need to use LDAPSYNC which gets its information directly from a single LDAP.
VMMSYNC is a ‘ONE WAY’ synchronisation
i.e. If you delete a user in Maximo, the LDAP will not be updated to remove the user.
LDAP = Lightweight Directory Access protocol
Using an LDAP product allows users to authenticate against a central security product rather than authenticating internally within an application (e.g. Maximo)
Maximo supports 2 LDAP products – Others may work but are not officially supported.
Microsoft Active Directory (MSAD)
Tivoli Directory Server (TDS)
When Maximo makes use of LDAP, only authentication (userid/password check) happens against the LDAP. Users authorisations to individual Maximo applications / actions etc after they have authenticated (logged in) are based on information in the group related tables within Maximo.
When using LDAP for authentication, the user related tables still need to be popu
So, the first thing to realise is.......If a user cannot be seen within WebSpheres Federated Repository then VMMSYNC will not be able to populate their information to Maximo. Check you can see the user in WebSphere before wasting time troubleshooting VMMSYNC. If you cannot see them, then your problem is not with VMMSYNC, but with populating the federated repository.
The Crontask
VMMYNC is a Maximo CRONTASK.
You can have multiple ‘instances’ of the crontask.
The following are the main parameters to set up for the crontask instance.
1.1. Principal - The user used to access VMM/WebSphere e.g. cn=w
2.2. Credential – Password for principal
3.3. Usermapping – Update basedn in the xml to point to starting point in LDAP for user sync e.g. base
4. GroupMapping – Update the basedn to point to the starting point in the LDAP to search for groups.
5. Check the Grou
Ensure the crontask instance is enabled and has a realistic schedule set…… vmmsync can take a long time to run when many users and groups are being sync’d.
A good idea might be to run it on a once a day basis, scheduled outside of normal working hours if possible.
VMMSYNC Crontask Instance XML
The User XML populates the following tables
MAXUSER
PERSON
PHONE
The Group XML populates the following tables
MAXGROUP
GROUPUSER
Extracts showing main USER xml from a VMMSYNC instance.

 BASIC
DEBUGGING
BASIC
DEBUGGING Set the VMMSYNC Cron Task into debug mode in Maximo
1.
Go to the Logging application (under System Conf
2.
Find and select the crontask root logger (not crontaskmgr) in the
upper Root Loggers pane.
3.
Find and select the VMMSYNC logger in the lower
Loggers pane.
1.
If one does not already exist, add it:
1.
Click the New Row button in Loggers pane while the crontask Root
Logger is selected.
2.
In the resulting pane click the Detail Menu icon for
the
3.
Select VMMSYNC from the Select Value dialog.
4.
Click the Select Value button on the Log Level parameter.
5.
Select DEBUG from the Select Value dialog.
6.
Save the record.
7.
Select Apply Settings from the Select Action menu.
Then
temporarily disable any other VMMSYNC instances (for clarity in the logs) and
allow the vmmsync instance of interest to run.Save the logs e.g. SystemOut.log and SystemErr.log
Review the debug logs.
First find this message which is the start of the sync
BMXAA6790I - VMM Synchronizer is going to perform Full Synchronization
Check the basedn matches the vmmsync instance xml e.g.
Synchronizing VMM users from base: {OU=
Next is the request made to VMM…this should match the xml regarding properties to get from VMM
[DEBUG] Synchronizing VMM Users: VMM search request
xmln
m:se
Next is the response back from VMM with the user records (each user is listed as an entity)
[DEBUG] Synchronizing VMM Users: VMM search results
xmln
repo
At the end of the user list you may get a cookie. This means it is not the last page to be returned…..look for the next set of results that show this same cookie to continue working through the users
You will see also how many users were synchronised e.g.
[INFO] BMXAA6794I - 134 User changes were processed
The Group xml is set out in a very similar fashion to the user xml. i.e. basedn, attributes to get from VMM, Tables to update etc.
Log entries are also very similar e.g.
[DEBUG] Synchronizing groups from base
Followed by the requests and the response for groups and groupmembers
VMM Groups: VMM search request
VMM Group members get request (One for each group found).
TIPS
The biggest tip for debugging is try to disable all other VMMSYNC crontasks, if you have more than one, when creating debug logs. It can get very confusing (for me at least) when many are running at the same time. They also tend to fill the logs quickly, so pertinent information can be lost if the logs size settings are for small files.
Scan the logs for any errors reported by Maximo or WebSphere during the process. including request timeouts. VMMSYNC can take some time to run (especially if thousands of users) and it is not uncommon for it to receive a transaction timeout from WebSphere if the transaction timeout is set too low.
Double check that any customised XML matches the LDAP data and also that any new fields created in Maximo tables are long enough for the data being placed in them and that the data type is correct for the field.Check the 'scope' set in the xml as this determines if just that one level in the LDAP is sync'd or if all sublevels are also sync'd.
Do not run it too frequently. I have seen cases where the sync is nowhere near finished and is then started again.
SQL logging can be turned on for VMMSYNC to show the table updates. This can be useful if everything looks to be correct, users are returned by VMM but do not make it into the Maximo tables.
Subscribe to:
Posts (Atom)
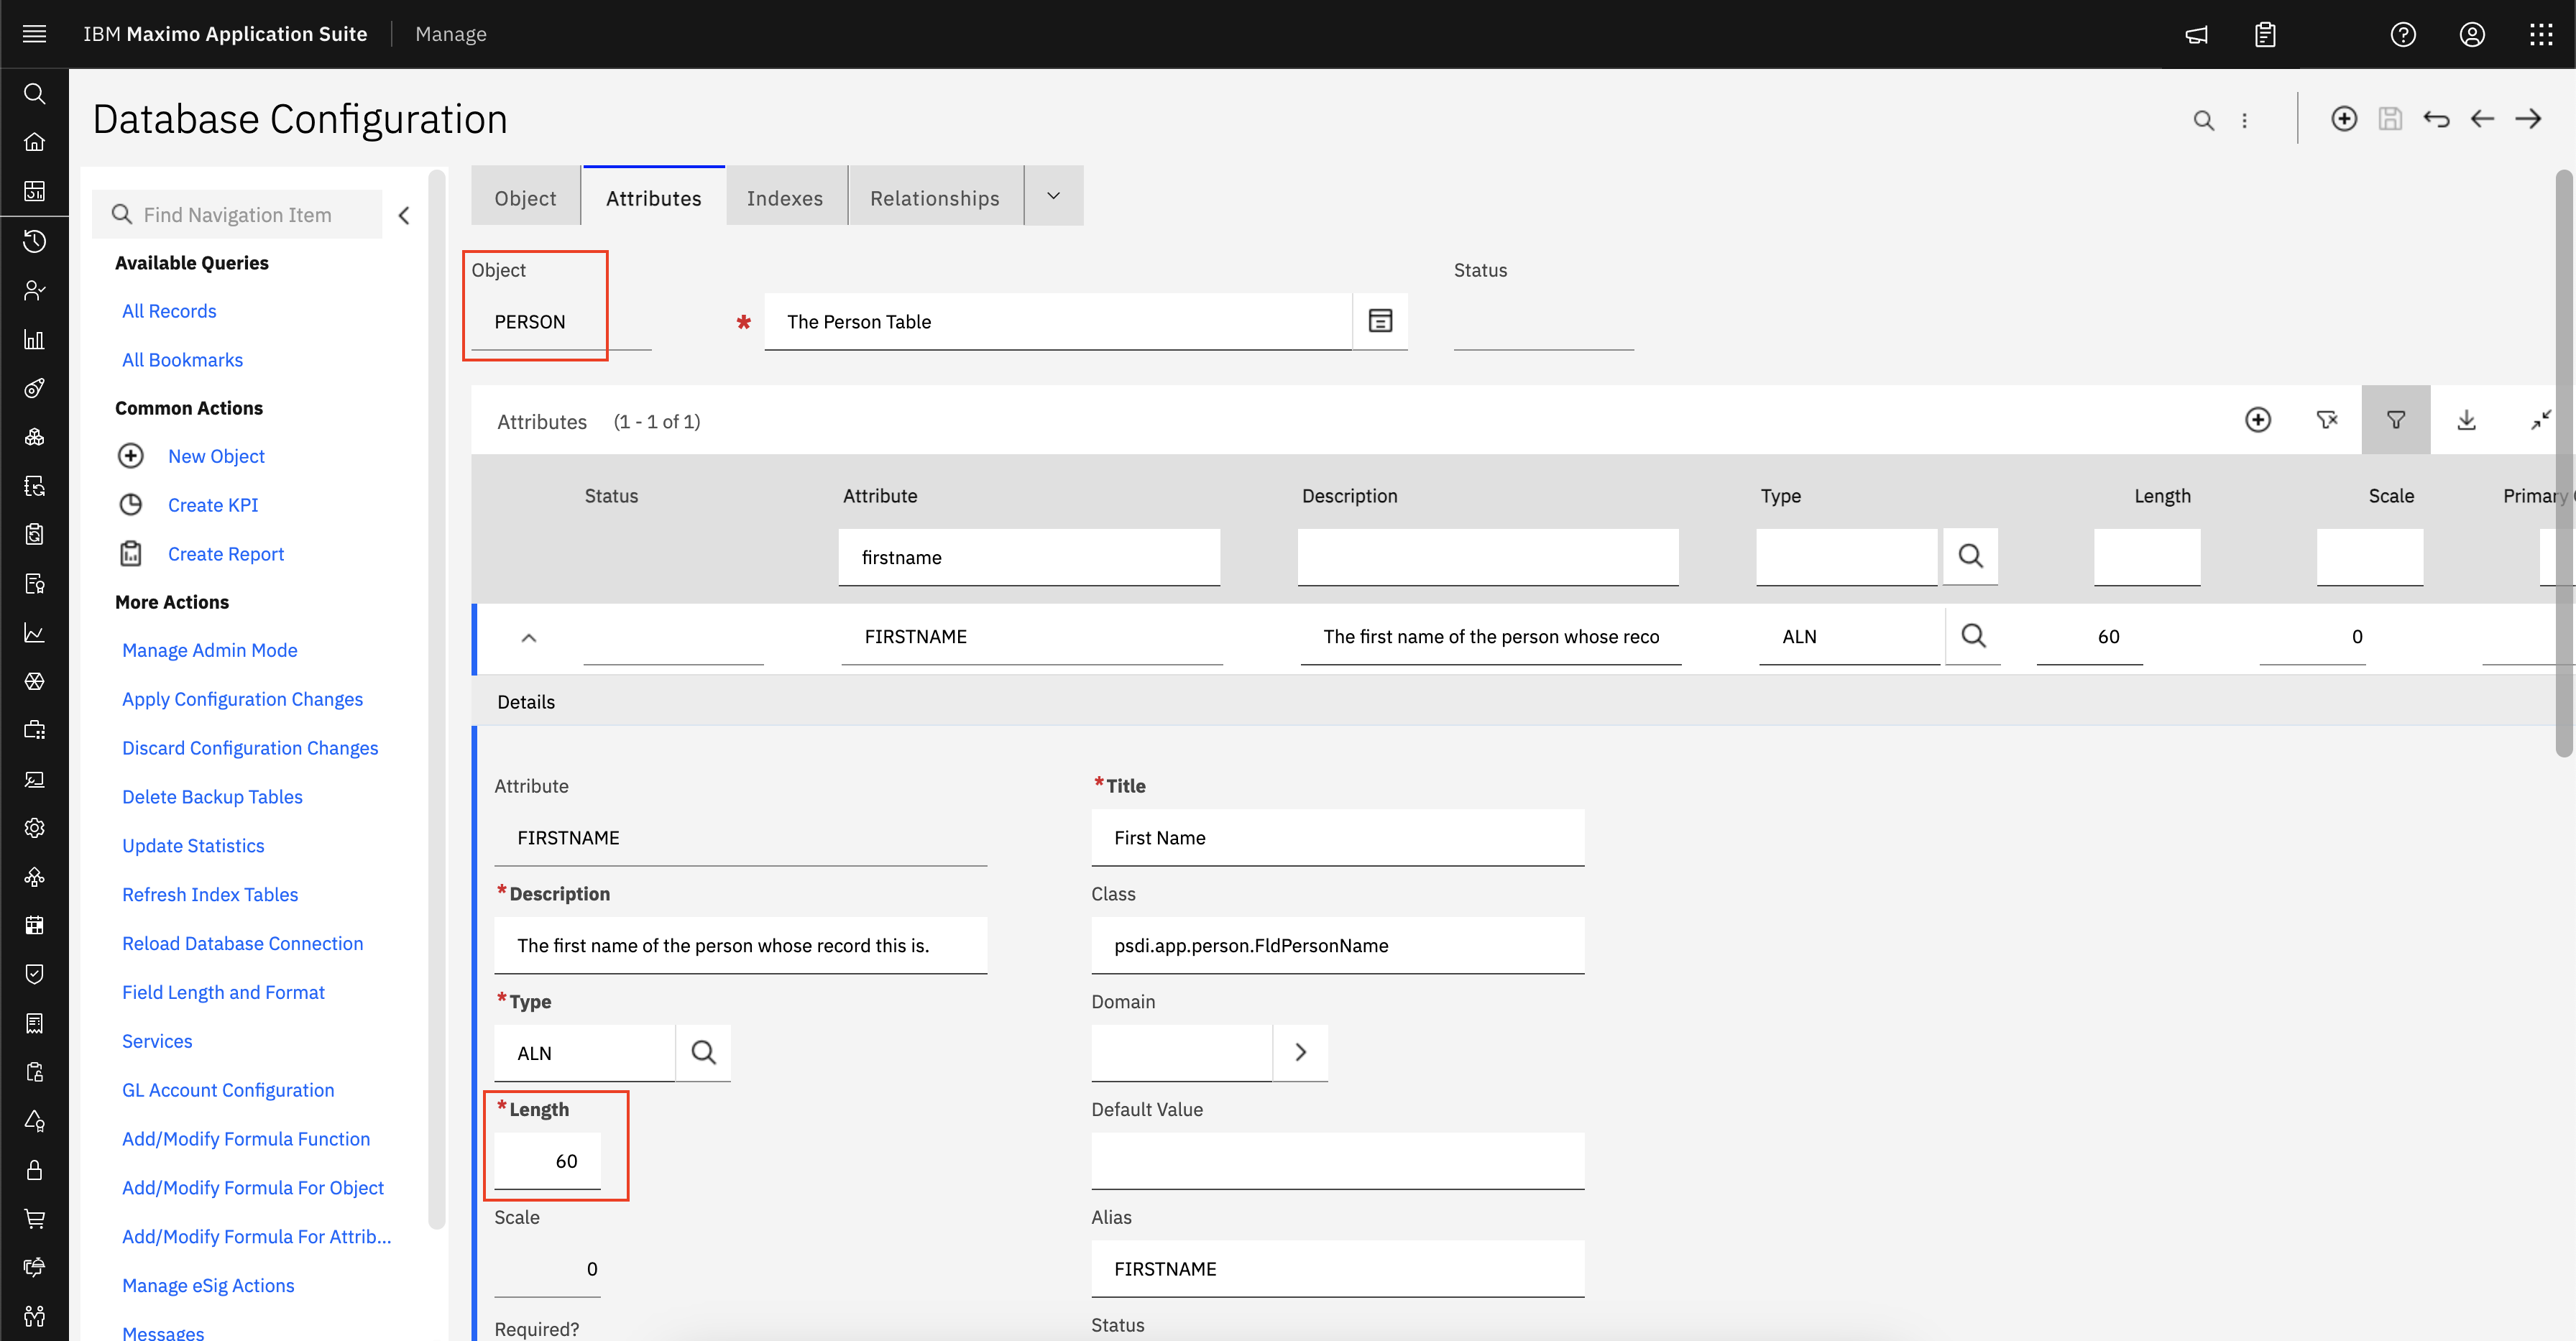
Modifying the size of a user field in MAS
Question In MAS you can verify that many of the fields of the user records are also present in Manage application, but how can we change t...
-
Queues The IBM Maximo uses these queues for data integration purposes: Inbound sequential (sqin) - Maximo sequential queue used for...
-
Application Event Model Overview Events are sent to the user interface framework whenever an end user clicks a toolbar button in th...
-
 Here is the sample code. ? 1 2 3 4 5 6 7 8 9 10 11 12 13 14 15 16 17 18 19 20 21 22 23...
