Search This Blog

Wednesday, May 28, 2014

How to set up a horizontal cluster for a Maximo sandbox using WebSphere Application Server 7

Pre-requirements

This tutorial is based on WebSphere Application Server 7 and Maximo 7.5. Some specifics steps may differ from version to version, but the overall process is the same.

The user required to execute this tutorial must have administrative privileges in WAS to create nodes, clusters, start and stop servers, among other things.

To simplify the configuration of the horizontal cluster provided by this guide, no directory information services (LDAP), such as IBM Tivoli Directory Server or Microsoft Active Directory, were installed or configured.

It is also necessary to have at least two machines for the horizontal cluster. One of them must have Maximo successfully deployed. The other must have only an Application Server installed, with no Deployment Manager (DM). In order to improve performance of your environment, you may install the database or deployment management in separate machines.

The standalone Application Server that you want to federate must be up and running before starting this guide. 

After executing this guide, you should have a horizontal cluster environment similar to the image below: 
 
image
 
Note: This guide requires readers to have basic WAS and Maximo platform knowledge.
 
Adding a node
 
1. Login to the WAS admin console as wasadmin (Maximo server / WAS with DM).
2. Navigate to System administration > Nodes.
3. Click Add Node.
4. Select Managed Node.
5. Click Next.
6. On the next page, provide all the information about the Node you want to federate: 

image
 
7. Click OK.
8. On the next page, it will give an option to run the node as a Windows Service. Do not select this option and click OK.
9. The creation node process will start and the logs will be displayed.
10. Once the process has finished, you should see two nodes: one from cell 1 and another for cell 2 that you have just added.
 
image
 
11. If the nodes are not synchronized, select nodes 1 and 2 and click Synchronize.
12. At this point, you will no longer be able to login to WAS from cell 2 since it is now managed by the Deployment Manager.
 
 Creating the cluster
 
1. Navigate to Servers > Clusters > WebSphere application server clusters.
2. Click New.
3. On the next page, enter a Cluster Name (e.g. MaximoCluster).
4. Select Prefer local, if it is not selected already.
5. Click Next.
6. On the Create first cluster member page, enter a member name (e.g. cluster_member_1).
7. Select Node 1.
8. Select Generate unique HTTP ports, if it is not selected already.
9. Select Create the member using an existing application server as a template > MXServer.
10. Click Next.
11. On the next page, add another member to the cluster (e.g. cluster_member_2).
12. Select Node 2.
13. Select Generate unique HTTP ports, if it is not selected already.
14. Click Add Member.
15. Click Next and Finish.
16. Your cluster is down at this point but it will be started later.
 
image Creating new ports
 
1. Navigate to Environment > Virtual hosts.
2. Select maximo_host.
3. Click New and enter the following:
Host Name: *
Port: 9081

4. Click OK and save changes.
5. Create more ports if needed. 
 
 Deploying Maximo
 
1. Navigate to Servers > Server Types > WebSphere application servers.
2. Select MXServer and the server from cell 2, if not stopped yet, and click Stop.
 
image
 
3. Navigate to Applications > Application Types > WebSphere enterprise applications.
4. You should see the Maximo installed but it is not running in the cluster yet.
5. Select Maximo and click Uninstall.
6. Click Install.
7. Select the maximo.ear file. 
8. Click Next.
9. Select Fast Path.
10. On the Step 1 page, select Deploy web services and click Next.
11. On the Step 2 page, hold Ctrl key and select MAXIMOCLUSTER and webserver1 from Cluster and servers section.
12. Select all the modules and click Apply
 
image
 
13. Click Next.
14. On Step 3, select all the Web modules with maximo_host as Virtual host.
15. Click Next and Finish.
16. You should have Maximo deployed in the cluster at this point.
 
Starting the Cluster 
 
1. Navigate to Servers > Clusters > WebSphere application server clusters.
2. Select MaximoCluster and click Start. The cluster might take several minutes to start.
3. Navigate to Servers > Server Types > WebSphere application servers. 
 
image
 
4. The cluster members should be up and running.
5. Navigate to Applications > Application Types > WebSphere enterprise applications.
6. Verify that Maximo should also be running at this point.
 
image
 
7. Navigate to Environment > Update global Web server plug-in configuration.
8. Click OK.
9. At this point, you should be able to login to Maximo.
 
Testing the Cluster
 
To ensure that the cluster configuration is working properly, execute the following steps:

1. Navigate to Servers > Server Types > WebSphere application servers.
2. Stop cluster_member_1.
3. You should be able to login to Maximo even when one of the cluster members is down.
4. Start  cluster_member_1.
5. Stop cluster_member_2.
6. You should be able to login to Maximo even when one of the cluster members is down.
7. Start  cluster_member_2.

Monday, April 7, 2014

Use Email Interaction Setup to Change Status

Below are the steps to setup Email Interaction:
1. Create a new record in the Email Interaction Setup application:

For example, call the new configuration MFWO


Setup Object Status Change configurations:

Case 1: If the work order status is APPR , mobile user can reply with 1 to set status to INPRG or 2 to set status to COMP


Case 2: If the work order status is INPRG, mobile user can reply with 1 to set status to COMP or 2 to set status to CLOSE:


Attach a communication template (MFMAILSENDWO) to send to the owner of the work order (WOWNER):


2. Setup email listener:

Create a email listener address mx4mail:


Go to select action menu, select security settings.
Add a row for workorder object:


Tick the Active checkbox and save the record:


3. Create an Escalation:

Create an escalation called MFMAILSENDWOM with the condition below:

exists (select 1 from mfmailst where mboname='WORKORDER' and origin=1 and workorder.status=status) and parent is null and owner is not null


Attach an out of the box action to send email for the work order:


Below is the definition of the MFMAILSENDWOM action from Actions application:


Steps to test Email Interaction:
1. Create a new work order 1273.
2. Click Set Owner icon on the toolbar. Assign the work order to Wilson:


3. Approve the work order:


4. Email arrives in Wilson's inbox:


5. Wilson reply with 2 to complete the work order:


6. Wait 1 minute. Wilson receives another email that says work order 1273 has been changed to complete status:


7. Log in to Maximo to confirm that work order 1273 has been changed to complete:

Email Interaction Setup Using Workflow

Steps to setup Email Interaction:
1. Create an Email Listener record mx4mail
Workflow Process = MFMAILRCV
Cron Task Name = LSNRCRON
Cron Task Instance = LSNR3
email interaction setup WFWO


Crontask instance LSNR3 is active in the Cron Task Setup application:


2. Build a workflow process in Workflow Designer to reinforce a business process:

For example: Create a workflow process called MFMAILWF
Newly created work order record will go to Financial Approval 1
If the estimated labor cost is greater than $500, then it will go to Financial approver 2
Then someone will perform some safety check:


3. Create a record in the Email Interaction Setup application:


Attach a communication template
For example, MFMAILRESCOMPWF:


Testing:
1. create a new work order in Work Order Tracking application
Route the record to workflow via the Route Workflow icon:


2. Wilson receives email in his in-box since he is the originator of the work order

option 1 - I approve this work order. Route to next step in workflow.
option 2 - Cancel this work order


3. Reply with 1:


4. Wilson receives some email that says the workflow assignment has been approved


Wilson receives another email with
option 1 - Initiate work - in progress
option 2 - Cancel this WO


5. Reply with 1 in the body:
i.e. Get Safety and Permit Approval


6. Wilson receives some email that says the workflow assignment has been approved:


7. Reply with 1:


8. Work Order 1275 has been changed to INPRG status


Go to select action menu > workflow > view workflow history:


This work order record has gone through the entire workflow without having a user logged into Maximo.

New videos for Maximo Asset Management!

Check out the full library of Maximo Asset Management videos from IBM Education Assistant!
 

Maximo 7.5 Performance Technotes links

SCCD 7.5.1 Performance Education Session
 
Correcting Slow User Queries
 
Maximo Performance Best Practices
  
Best Practices for System Performanc​e 7.5
 
JVM Separation Process
 
Out Of Memory errors on the systemout.log
 
Database Connection leak
 
Using System Instance Properties to Control Cron Tasks
 
Parameters to improve Maximo performance using WebSphere
 
Stopping Data from Auto-populating List Tab
 
Configuring Autofill Properties
 
WebSphere 7.0 fixpack 27 or higher with Java SDK 1.6.0 SR12 Cumulative Fix
 
Understanding Memory Requirements For 32 And 64 Bit Systems
 
Understanding Search Methodologies
 
 
SQL SPECIFIC Technotes:
Maximo Performance on SQL Server - Turning off Page Locking
 
Maximo 7.5 on SQL Server out of memory and performance problems
http://www-01.ibm.com/support/docview.wss?uid=swg21592716

Thursday, March 27, 2014

UI framework event handling in Maximo

Application Event Model

Overview

Events are sent to the user interface framework whenever an end user clicks a toolbar button in the application toolbar, selects an action listed in the Select Action menu, clicks a push button within the user interface, or selects an option from a menu next to a field.  Many other types of user interactions also send events to the user interface framework, but those widgets previously listed are the ones that application developers are mostly likely to configure.
This article explains what events are sent to the user Interface framework when your end users interact with those types of widgets. We will also explain how the user interface event handling framework handles those events.  This article should allow you adjust your user interface to use a wide variety of widgets to fire and handle events to best meet your end users usability needs.

Toolbar Button Events

       Example "Save" Toolbar Button
       Find the Signature Option that corresponds to the Save button


Select Action Menu Events

       Example Menu Action “Duplicate Action”
Choosing a Select Action menu item causes the user Interface framework to receive an event that matches the Signature Option id associated with this Select Action menu item.   In the example above, the user Interface framework would receive an event called “DUPLICATE” based on the details of the configured Signature Option as shown below.
       Translating a Select Action to the Underlying Event


Configuring Push Button Events

Example Select Members Push Button
You can associate a push button with an event using the “Event” field in Application Designer or using the “mxevent” attribute in the presentation xml. You can optionally specify the ID of a control that processes the event using the “Target ID” field in Application Designer or “targetid” in the presentation xml.
When an end user clicks the button, the event ID specified in that panel above “selectmembers” is received by the user interface event handling framework.


Popup Menu Events

Each field-level popup menu has underlying mxevents associated with each of the menu choices.
       Example Popup Menu
       Configuration of Popup Menu for this Field
       Actual Popup Menu for this Field (from Menus.xml)
Notice the events listed for each of the choices shown.  That event string is the event that gets sent to the underlying user Interface framework when this menu choice is clicked.


User Interface Framework Event Handling

The user interface framework processes the event received in this order:
  1. First the framework checks to see if the event matches a signature option (sigoption) ID.
    1. If the event does match, the user interface framework checks to see if the user has privileges for that signature option.
    2. If they do have security privileges, the framework checks to see if there is a special flag set to handle the Signature option in an Advanced way.  If the Signature option does have a flag the user interface handles that flag accordingly.  So if the Signature Option is flagged as an Action then the User Interface invokes that action. Here is an example of a menu option that would start a System Configuration->Platform Configuration->Action called “INSERT” for the Action object instead of firing the default INSERT event. 
                      Setting Advanced Options to point a Signature option to an Action
                       The Underlying Action that would get called by the Advanced Sigoption Metadata Above
  1. If there is not an “Advanced” Flag for this sigoption then the framework checks the target control/component to see if it handles such an event (by implementing a method that matches the event name.)  Events sent from Select Action and Toolbar buttons will rarely match this check as the target control/component for the Select Action and Toolbar buttons is the Application Toolbar, and it rarely handles the event directly.
  2. If the control or component doesn’t have a method that matches then the framework will check to see if the DataBean or ApplicationBean associated with the target component/control has such a method; if it does then that method will be called.  The Select Action or Toolbar buttons are bound to the ApplicationBean, so will check there for a method that matches.  Buttons and Button groups can be bound to other Databeans based on where they are placed within the application.
  3. If a targetid is not configured in the Application Designer for the events, the framework will check the Application Bean for the application to find a matching method.
                    Example Application Bean method to handle the INSERT signature option event
  1. If the Application Bean doesn’t contain a matching method, the Mbo and MboSet of the DataBean will be checked for a matching method as well. 
  2. If no such method exists or the method returns the integer constant for EVENT_CONTINUE, the framework will then check to see if there is a dialog in the current application with a dialog id that matches the event name.  If such a dialog exists then that dialog will be displayed.
  3. Finally the framework will check to see if there is a dialog in the System Libraries that has a dialog ID that matches the event, and it will display the dialog in that case.
If all of these checks fail, NOTHING will happen when the event is received by the user Interface framework.

Example

So putting all this information together, let’s go through the use case where an Application Developer may want to add a button to the user interface that would expose a functionality that is also exposed in the Select Action menu.  For example, in the Inventory application, let’s add a button on the main Inventory tab that would trigger the 'Adjust Current Balance' that is typically available only from the Select Action menu.
First we’ll look at the Sigoptions defined in the Inventory application in Application Designer to find the right event:
       Event is CURBALADJ
Drag and drop a button group and push button onto the main Inventory tab and set the event to CURBALADJ to match the signature option above.
       Configuring the Pushbutton Event and Label
Save the Application.
Now from within the Available Balance section, your end users can click the Adjust Current Balance button and pop up that dialog.
       Current Balance Adjustment window
With all the information you learned above, you could even put a field-level menu next to the current balance that let you fire this event (rather than a push button.)
Hopefully this explanation of the event model will help you enhance your user interfaces to meet your end user requirements.

More Detailed Information

Technically when the end user interacts with each of those widgets above, a click event is sent to the component, and the component translates that click event into a queued event that matches the description given above.  Sometimes to help debug issues in the field, the user interface team might turn on javascript event tracking and you might see these click events being sent from the client.

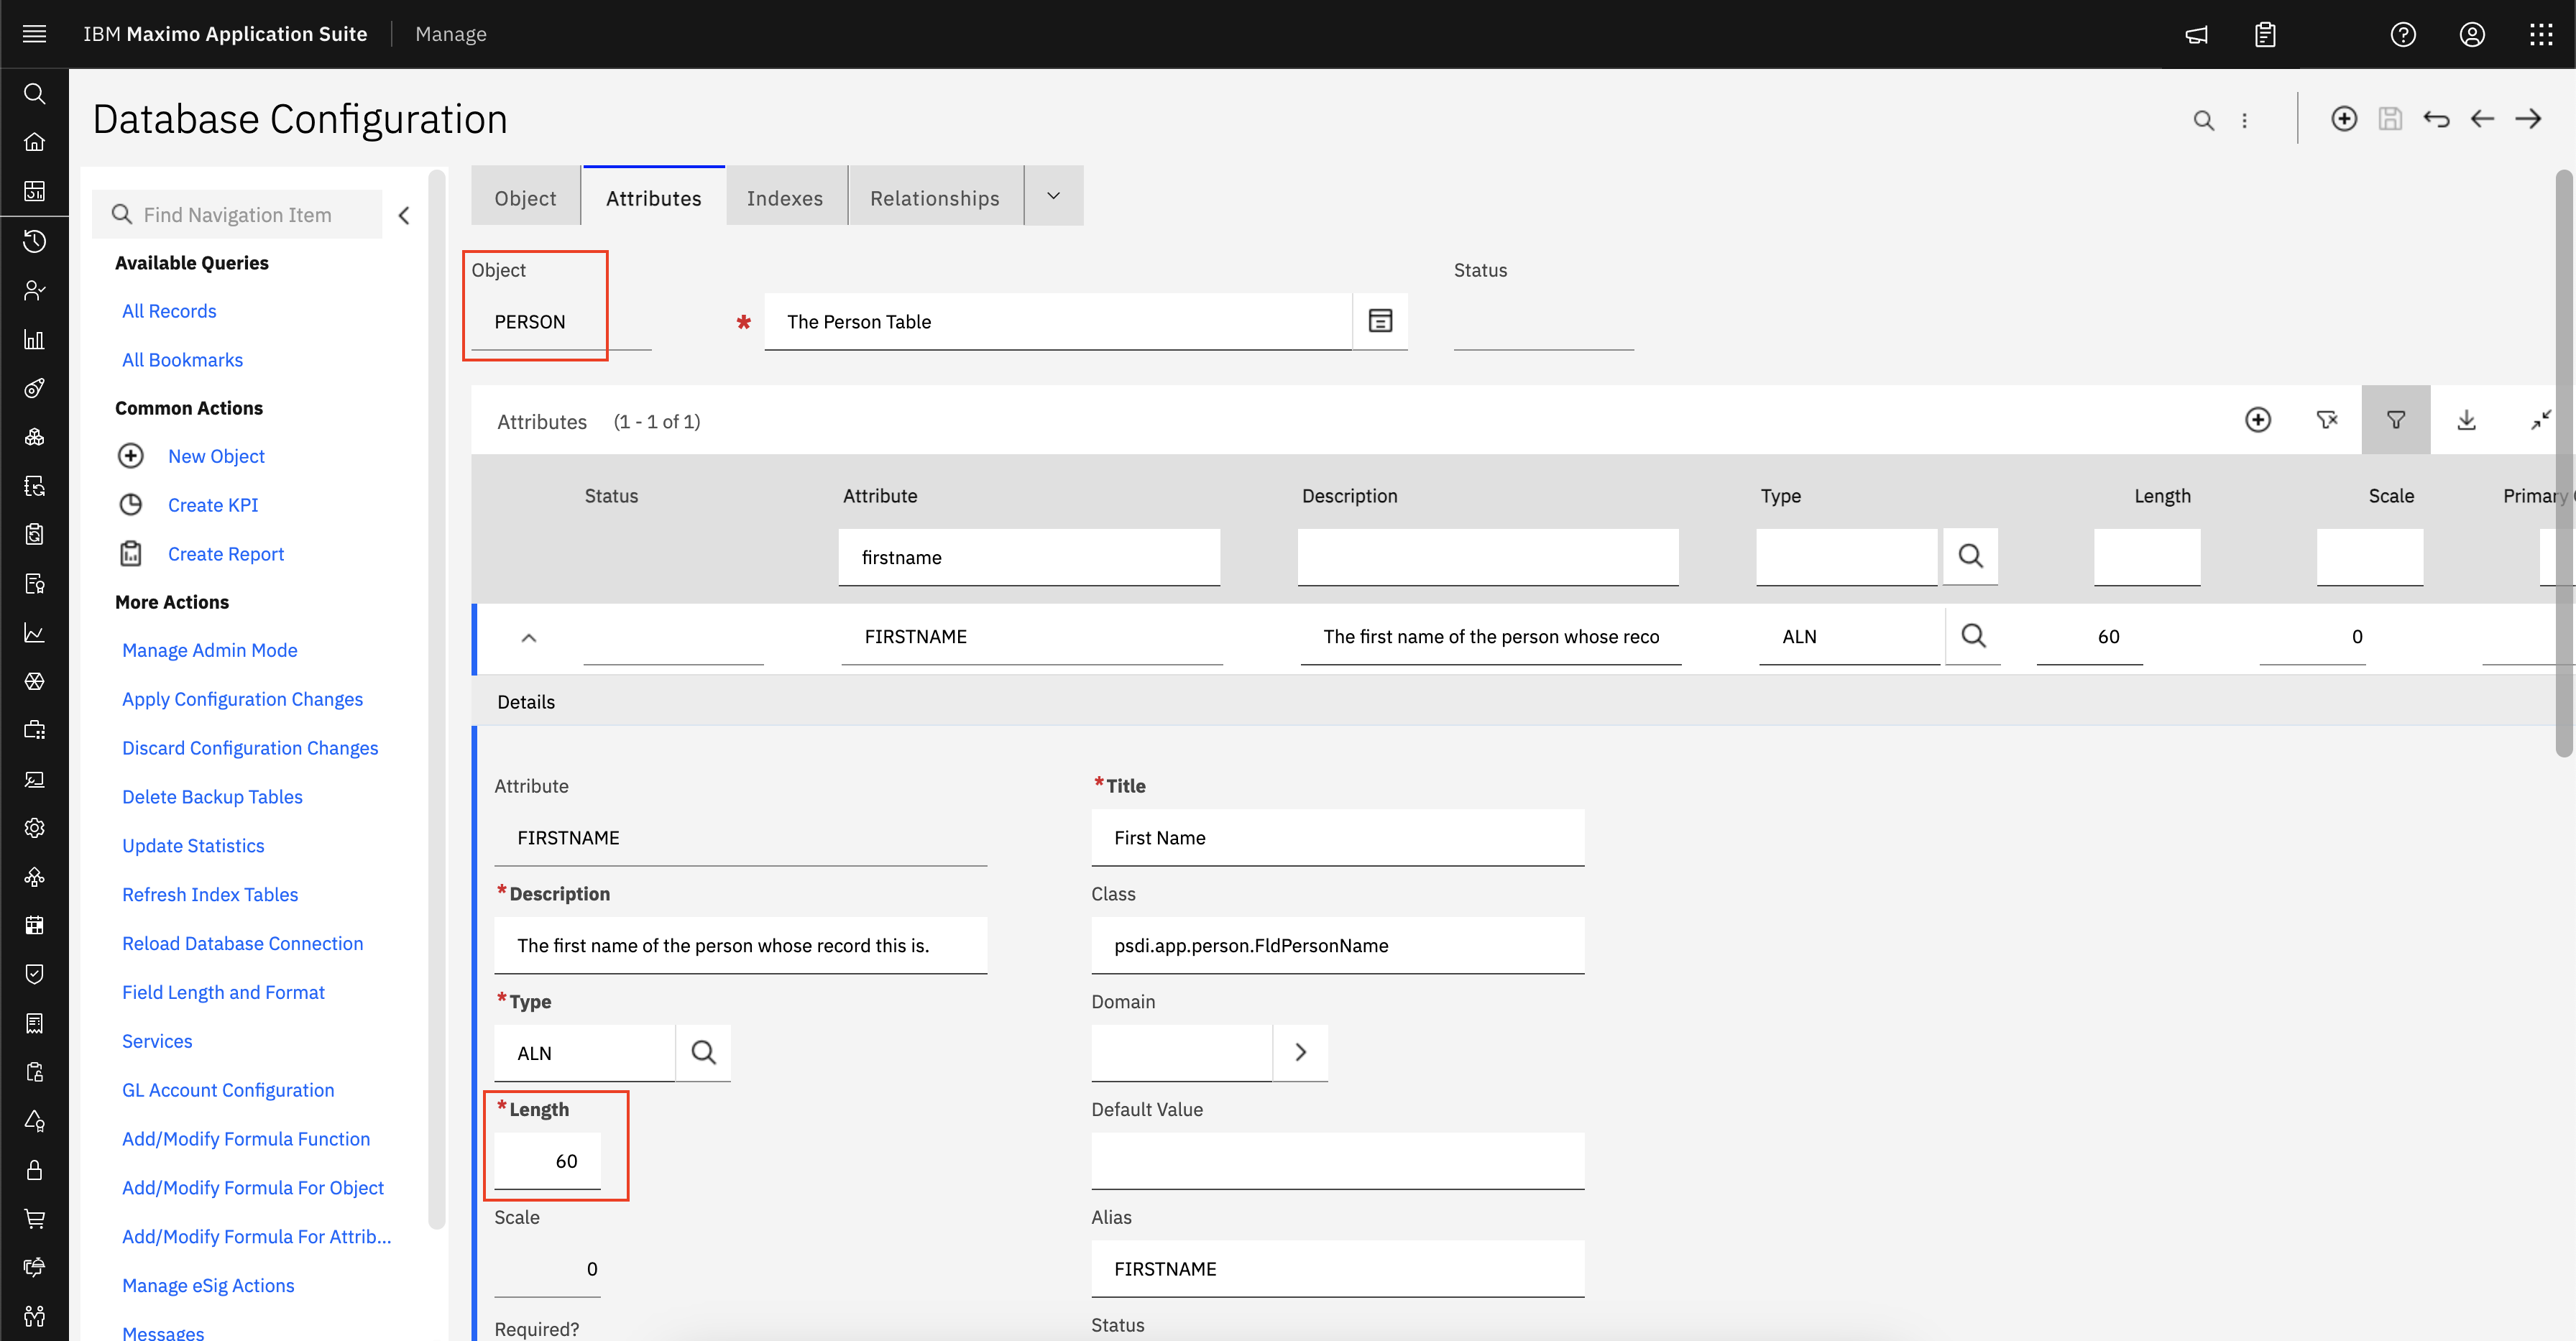
Modifying the size of a user field in MAS

  Question In MAS you can verify that many of the fields of the user records are also present in Manage application, but how can we change t...