Search This Blog

Friday, November 1, 2024

OpenShift commands

You can check the OC by running the instructions listed below. 


#login with admin user

oc login https://<master-server>:8443 -u admin -p redhat


#login as developer user

oc login https://<master-server>:8443 -u developer -p developer


#Logged in username

oc whoami 


#Create a new app from a GitHub Repository

oc new-app https://github.com/chetantiwary/example-app


#New app from a different branch

oc new-app --name=web nginx:1.10~https://github.com/chetantiwaryxxxx#mybranch


#Create objects from a file:

oc create -f anyobject.yaml -n <project>

Eg. oc create -f service.yaml -n operation


#Delete objects contained in a file:

oc delete -f anyobject.yaml -n <project>


#Create or merge objects from file

oc apply -f anyobject.yaml -n <project>


#Monitor Pod status

watch oc get pods


#Gather information of a pod deployment with more details

oc get pods -o wide


#do not show inactive Pods

oc get pods --show-all=false


#show all resources

oc get all

oc get pods

oc get service

oc get route

oc get secrets

oc get configmap

oc get limitranges

oc get resourcequota

oc get hpa dc/dcname

oc get pv

oc get pvc

oc get nodes

oc get ingress

oc get networkpolicy


#Get  Openshift Console Address

oc whoami –show-console


#Copy a local folder to app Pod under the folder /opt/jboss

oc cp ./file app:/opt/jboss

#Create a ConfigMap from file

oc create configmap my-config --from-file=config.properties


oc create secret generic my-secret --from-file=secret.key


#Create a ConfigMap/Secret from literals

oc create configmap my-config --from-literal=foo=bar --from-literal=app=blu

oc create secret generic my-secret --from-literal=secret.key=value


#Set a ConfigMap/Secret in a deployment

oc set env deployment/my-deployment --from configmap/my-config

oc set env deployment/my-deployment --from secret/my-secret


# Update deployment green with a new environment variable

oc set env dc/green STORAGE_DIR=/local


# List the environment variables defined on all pods

oc set env pods --all --list


# Import environment from a secret

oc set env --from=secret/mysecret dc/myapp


#Get Nodes list

oc get nodes


#Check on which Node your Pods are running

oc get pods -o wide


#List all pods which are running on a Node

oc adm manage-node node1.fqdn --list-pods ( fqdn = fully qualified domain name)


#Add a label to a Node

oc label node node1.fqdn label=value


#Remove a label from a Node

oc label node node1.fqdn label-


#create a PersistentVolumeClaim  

oc set volume dc/<dcname> --add --name=shared-storage \

-t pvc --claim-mode=ReadWriteMany --claim-size=1Gi \

--claim-name=shared-storage --claim-class=ocs-storagecluster-cephfs \

--mount-path=/opt/app-root/src/uploaded \

-n shared-storage


#Manual deployment 

$ oc rollout latest <dcname>


#Pause automatic deployment rollout

oc rollout pause dc <dcname>


# Resume automatic deployment rollout

oc rollout resume dc <dcname>


#Define resource requests and limits in DeploymentConfig

oc set resources deployment nginx --limits=cpu=200m,memory=512Mi --requests=cpu=100m,memory=256Mi


#Define livenessProve and readinessProve in DeploymentConfig

oc set probe dc/nginx --readiness --get-url=http://:8080/healthz --initial-delay-seconds=10

oc set probe dc/nginx --liveness --get-url=http://:8080/healthz --initial-delay-seconds=10


#Scale the number of Pods to 5

oc scale dc/nginx --replicas=5


#Define Horizontal Pod Autoscaler (hpa)

oc autoscale dc nginx --max=4 –min=2 --cpu-percent=60


#Create route with default hostname

 oc expose service <servicename>


# Create Route and expose it through a custom Hostname

oc expose service <servicename>  --hostname <hostname>


#Read the Route Host attribute

oc get route my-route -o jsonpath --template="{.spec.host}"

Or 

oc get route -n <project/namespace>


#Common Troubleshooting

oc delete all -l key=value

oc get all

oc describe pod <pod-name>

oc describe node <node-name>

oc get nodes -L <label>

oc label node <node-name> key=value

oc get endpoints -n <namespace/project>

oc describe node <node-name> | grep -i taint

oc get events 

oc get dc <dc-name> -o yaml

oc rollout latest hello

oc logs <hello-2-abcd>

oc expose service hello --hostname=hello.apps.lab.example.com 

oc debug pod <PODNAME>

oc edit service <service-name>

oc edit deployment <deploymentname>

oc edit ingress <ingressname>

oc edit route <routename>

oc adm cordon <nodename>  ( to mark the node unschedulable )


Reference Link : https://learn.redhat.com/t5/DO280-Red-Hat-OpenShift/OpenShift-commands-Cheat-Sheet/td-p/35371
Monday, August 5, 2024

IBM Maximo Application Suite - Manage 9.0.0: APARs fixed

 APAR and Known Issue Fixes

When an APAR or Known Issue has Manual Change in the first column, click the link or go to the Manual Change Details section for directions.
When an APAR or Known Issue has Behavior Change in the first column, click the link or go to the Behavioral Change Details section for information.
When an APAR or Known Issue has Database Change in the first column, click the link or go to the Database Change Details section for information.

IBM Maximo Operator Catalog v9 (240625)

 New IBM Operator Catalog  reference Link : 

https://ibm-mas.github.io/cli/catalogs/v9-240730-amd64/#whats-new


Wednesday, May 22, 2024

Maximo Application Suite Admin APIs 8.11.x


Set user application permissions

PUT

/workspaces/{workspaceId}/applications/{applicationId}/users/{userId}

Requires Workspace Administration permission in the target workspace. System Administration permission allows modifications to any workspace.


https://api.{mas-instance-id}.{mas-domain}/workspaces/{workspaceId}/applications/{applicationId}/users/{userId}


Reference Link : https://developer.ibm.com/apis/catalog/maximo--maximo-application-suite-admin-apis/api/API--maximo--workspace-management#setUserApplicationPermission

Friday, May 10, 2024

Modifying the size of a user field in MAS

 Question

In MAS you can verify that many of the fields of the user records are also present in Manage application, but how can we change their length?

Answer

We can change them by changing the field length in Manage application, and then running syncmetadata.sh script.

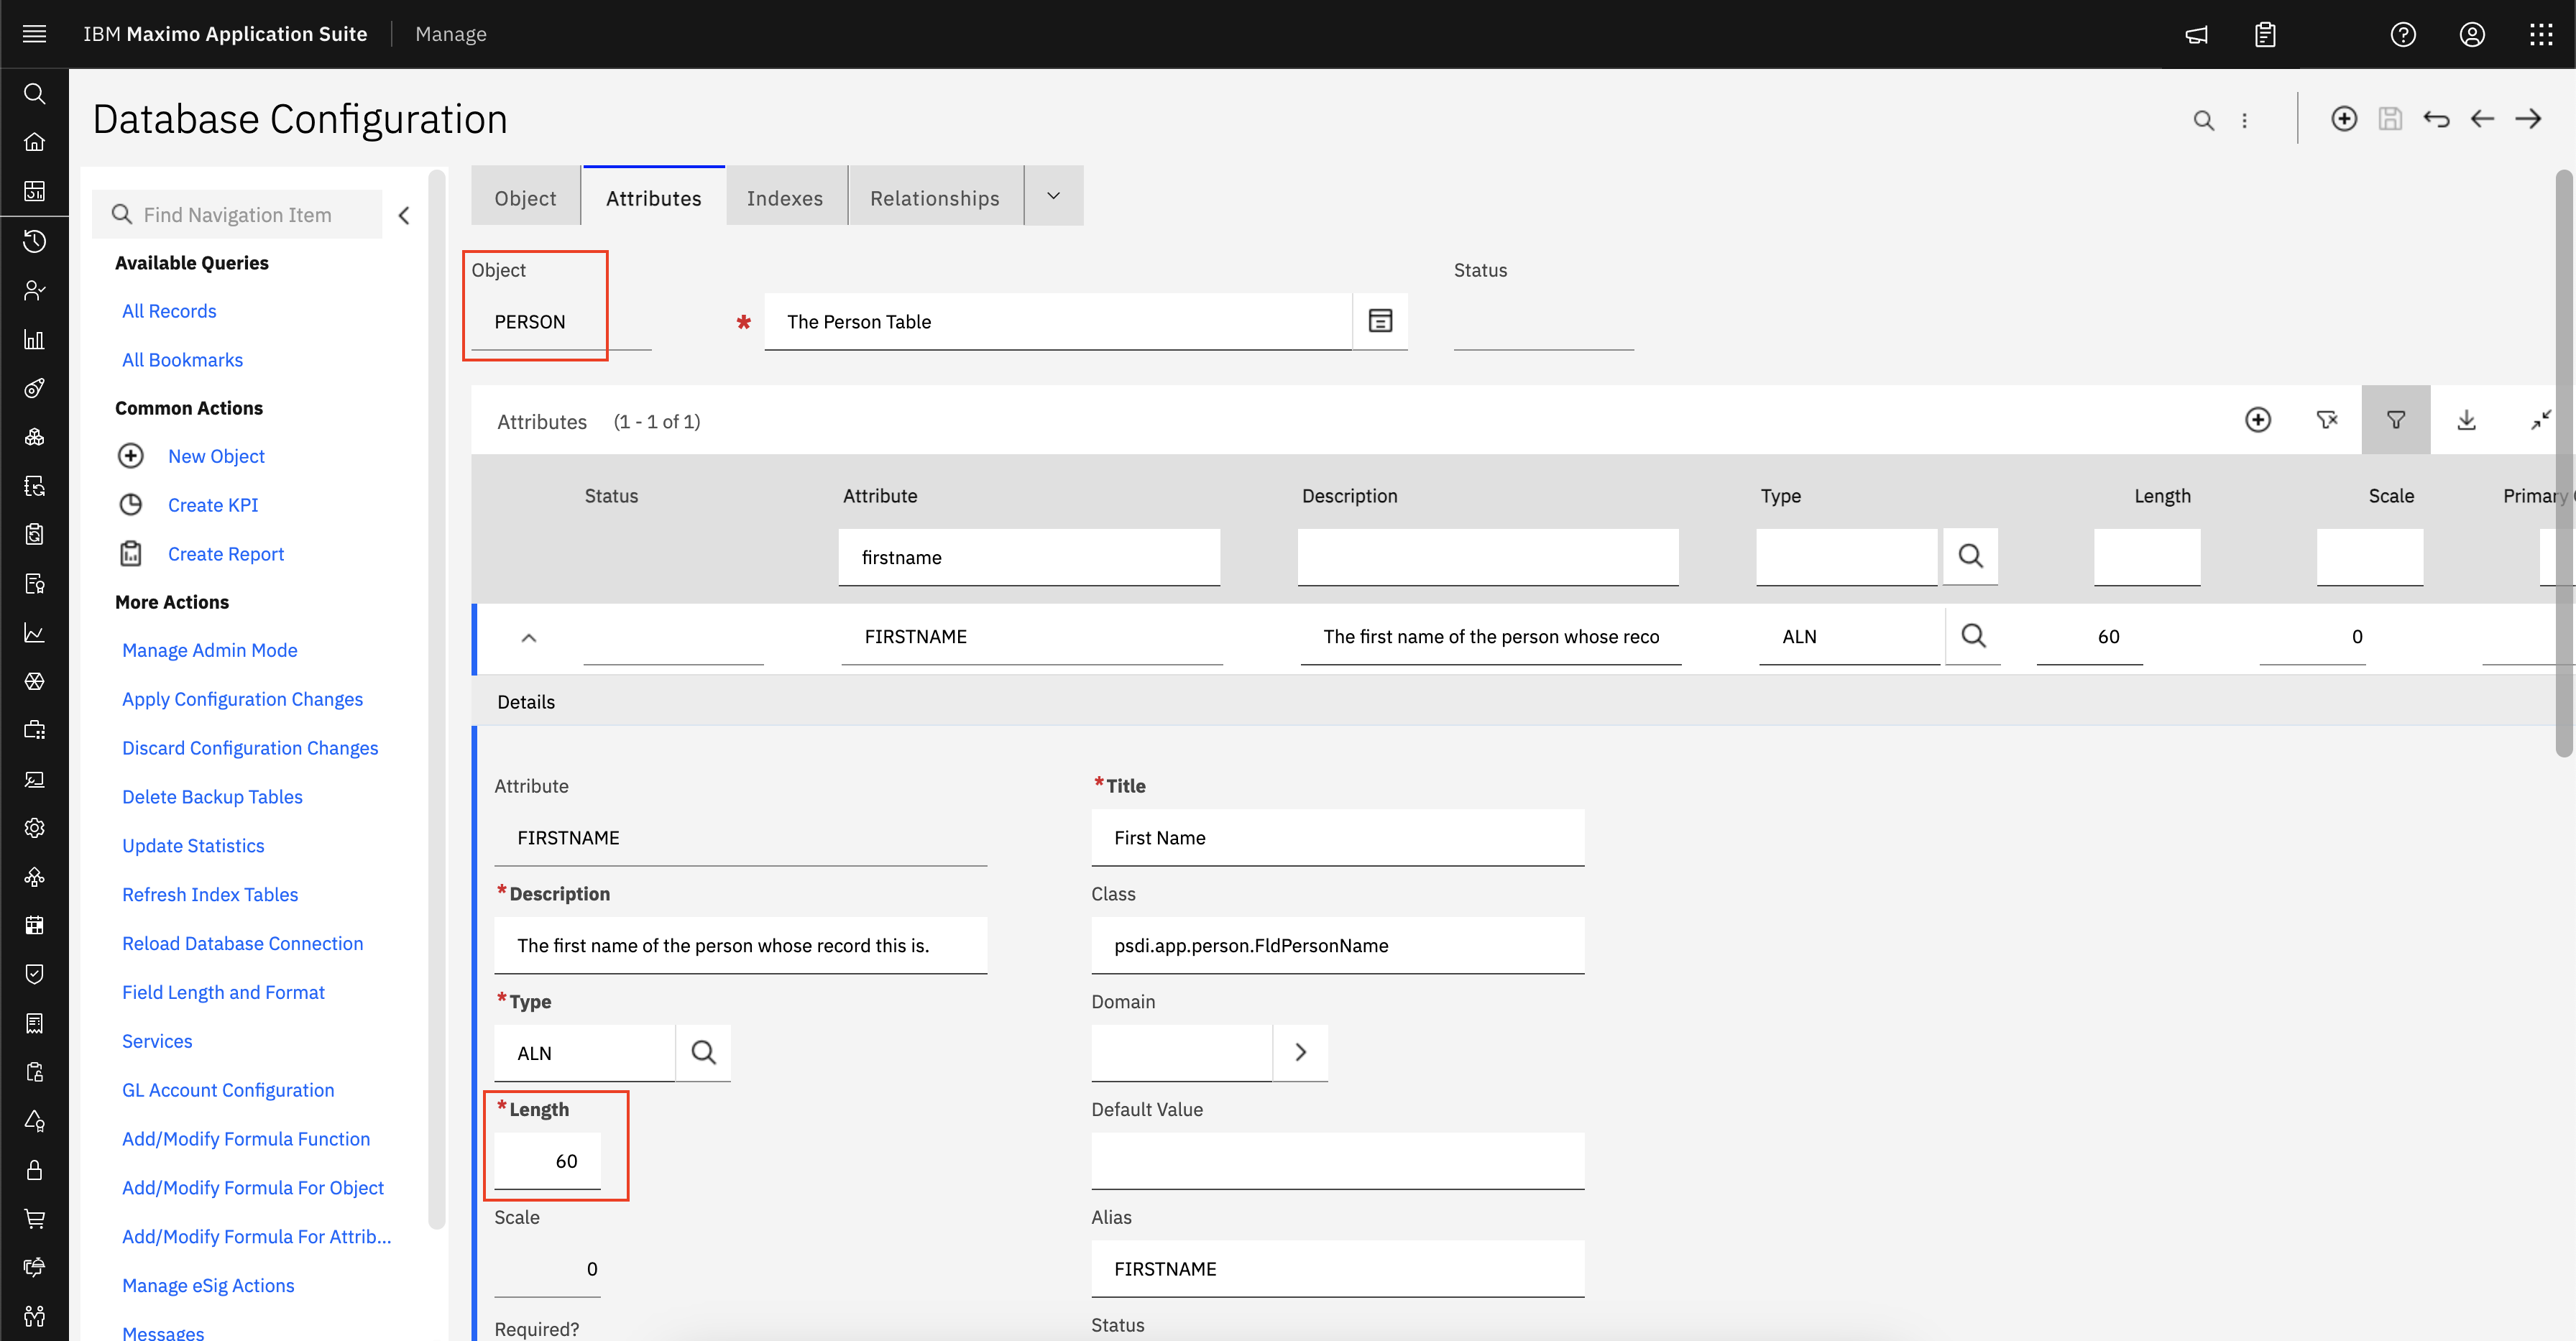
In this example we will use the PERSON.FIRSTNAME attribute from Manage, which is equivalent to the users Given Name attribute in MAS User Administration. The steps bellow represents the required changes and procedures in order to accomplish it.
   
In Manage:
  1. Go to Database Configuration Application.
  2. Change the field size in Manage and apply the changes via Database configuration application. 
Image representing the database configuration page, inside the PERSON object, indicating that the FIRSTNAME field length was changed to 60.
 
Using a database tool, run the following SQL Statement: 
update maxvars set varvalue = '1' where varname = 'METAUPG'

Go to Maxinst pod and run the following command: 
/opt/IBM/SMP/maximo/tools/maximo/syncmetadata.sh
 
After the command execution is complete, Manage and MAS databases should have their fields synchronized. 

Note: as this command is runned inside Maxinst pod, this is the only pod that need to be up.


Error: BMXAA0024E - The action READ is not allowed on object MAFAPPDATA accessing Maximo Manage

 Problem

This error occurs when attempting to log in to Maximo Manage and indicates insufficient access permissions for the user's security group. Specifically, the user lacks the "READ" permission for the "MAFAPPDATA" object structure.

Resolving The Problem

Access Security Groups Application:
Log in to Maximo with a user account possessing security group administration privileges.
Navigate to the Security Groups application within Maximo.

Identify User Security Group:
Locate the security group to which the user experiencing the login error belongs.

Grant "READ" Access (Object Structures Tab):
Select the relevant security group.
Click on the Object Structures tab.
In the search bar, locate the object structure named OSLCMAFAPPDATA.
Ensure the checkbox next to "OSLCMAFAPPDATA" is selected, granting "READ" access.
Save your changes.
Optional Verification (Application Tab):
While less likely to be the sole cause, you can also check the Application tab within the Security Group application.
Review the list of applications and ensure the security group has at least "READ" access for the "Maximo Manage" application itself.

Test Login:
After granting "READ" access to the "OSLCMAFAPPDATA" object structure, have the affected user attempt to log in to Maximo Manage again.
The login process should now proceed without the "BMXAA0024E" error.

MAS - Error in Mobile when new work order is sync which had an Inspection record

 There are times when the sync of the mobile device would bring a new Work Order, however on accessing that record there will be an error if it had an Inspection record associated with it.

Debugging the Problem

Mobile :
1)Create workorder in Mobile with inspection form
2)Update the Section A from Inspection form

Desktop:
1)Open the same workorder .
2)Update Section B,C from Inspection form

Mobile:
1)Refresh the workorder.

2)Check the Inspection form (B,C sections not updated on Inspection form)

RESULT: The initialized inspection in the first download only, this is by design

EXPECTED RESULT: The desireable effect is to sync the inspection every time

Resolving The Problem

The recommendation could be to modify the code to ensure a full sync occurs when a work order record is retrieved.

This could be achieved as follows:

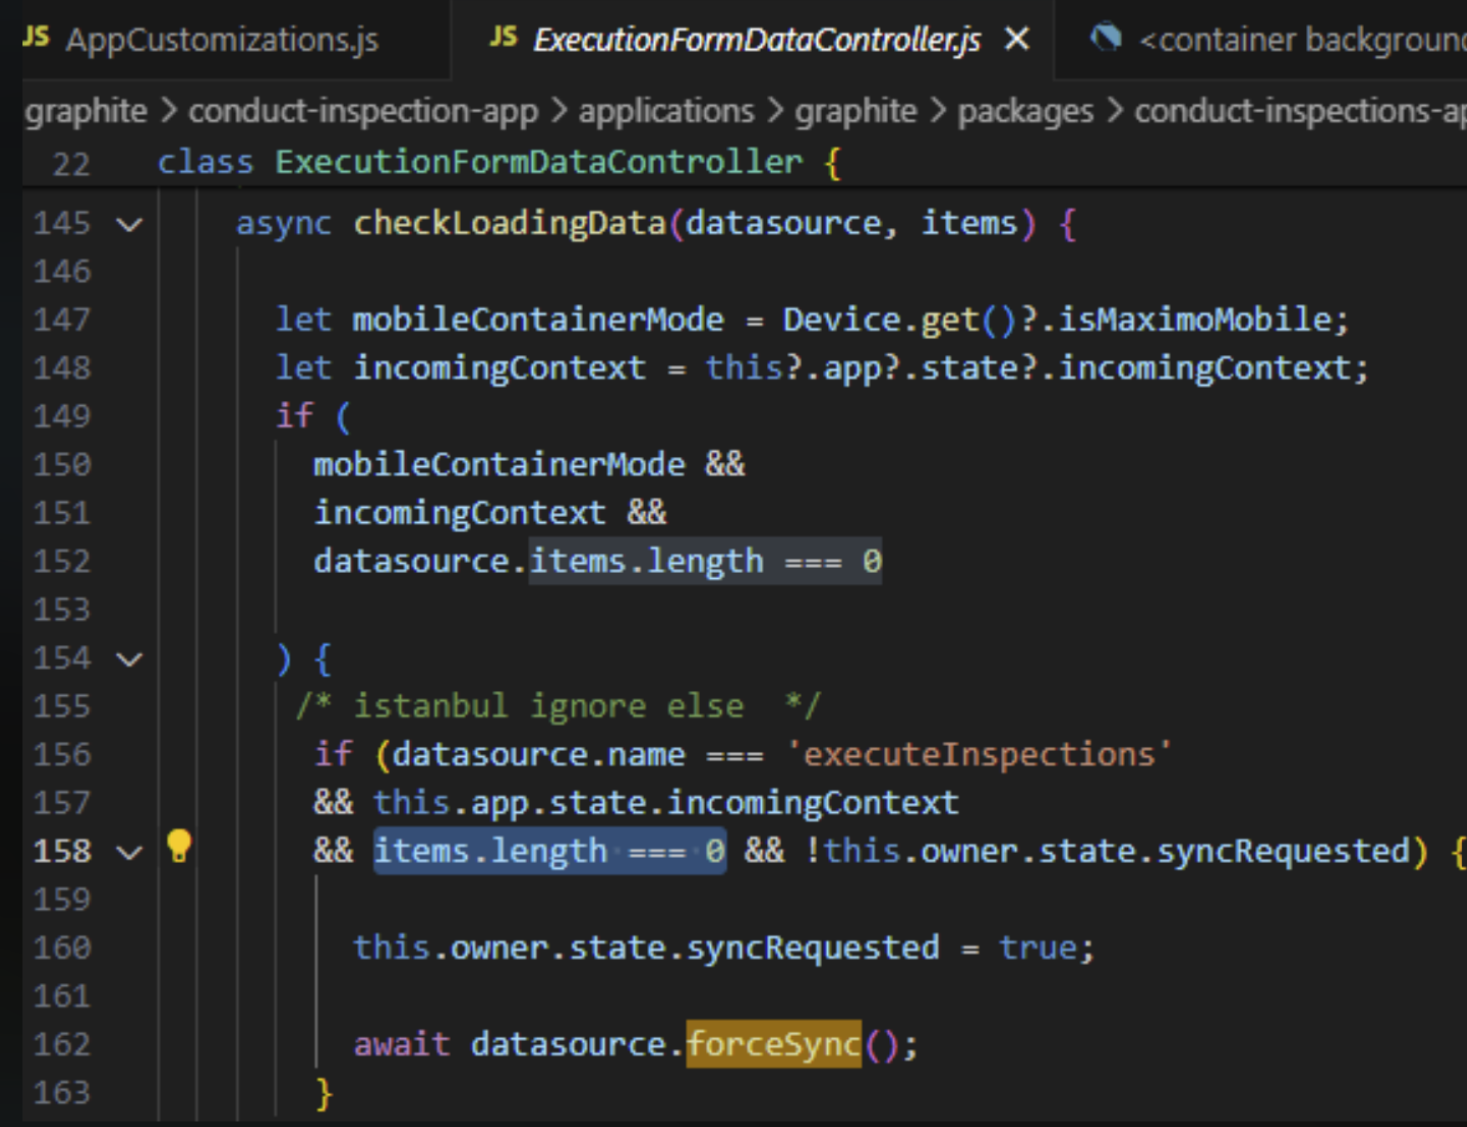
Customize the File to be changed:  ExecutionFormDataController.js to force a full data sync

Action:  Remove items.length check

ExecutioFormDataController.js sample code


Error 'Unable to connect to server' is displayed when you run a task that prompts for server restart

  Problem On Windows system, when you select a task that requires a server restart in Administration Services UI, and run that task, the tas...