This configuration creates a single-pod Liberty JMS server.
Steps
1. Log in to Maximo Application Suite as a system administrator.
2. From Suite administration, select workspaces from the side navigation menu and then select the Manage title.
3. On the Manage workspace details page, click Actions, and select Update configuration.
4. In the Server bundles row, click the edit icon.
5. In the Server bundles section, if the System managed checkbox is selected, clear it. Click Add bundle.
6. In the Name column, enter a name for the bundle, such as jmsserver.
7. In the Type column, select standalonejms.
8. To configure the queues, complete the following steps:
a. In the Additional properties column for your JMS server bundle, click View.
b. Optional: Set a different route subdomain.
c. In the Additional server config section, use XML to specify both the default queues and the custom queues that you want to add:
<?xml version="1.0" encoding="UTF-8"?>
<server description="new server">

    <!-- Enable features -->
      <featureManager>
        <feature>wasJmsSecurity-1.0</feature>
        <feature>wasJmsServer-1.0</feature>
    </featureManager>
    <applicationManager autoExpand="true"/>
    <wasJmsEndpoint host="*" wasJmsSSLPort="7286" wasJmsPort="7276" />
    <messagingEngine>
        <fileStore path="/jmsstore"/>
        <queue id="sqoutbd" maintainStrictOrder="true" maxMessageDepth="100000" failedDeliveryPolicy="KEEP_TRYING" maxRedeliveryCount="-1"/>
        <queue id="sqinbd" maintainStrictOrder="true" maxMessageDepth="200000" failedDeliveryPolicy="KEEP_TRYING" maxRedeliveryCount="-1"/>
        <queue id="cqinerrbd" maxMessageDepth="100000" failedDeliveryPolicy="KEEP_TRYING"/>
        <queue id="cqinbd" maxMessageDepth="100000" exceptionDestination="cqinerrbd"/>
        <queue id="cqouterrbd" maxMessageDepth="100000" failedDeliveryPolicy="KEEP_TRYING"/>
        <queue id="cqoutbd" maxMessageDepth="100000" exceptionDestination="cqouterrbd"/>
        <queue id="notferrbd" maxMessageDepth="100000" failedDeliveryPolicy="KEEP_TRYING"/>
        <queue id="notfbd" maxMessageDepth="100000" exceptionDestination="notferrbd"/>
    </messagingEngine>
</server>Note: The fileStore path can be modified to use a different directory to store JMS messages. If you are using persistent volumes, make sure that the fileStore path is configured correctly under the persistent volume directory. For example, if your persistent volume is mounted on directory /nfs, then the fileStore path might be /nfs/jmsstore.
d. Click Save to save the additional server bundle properties.
9. If you have a single server (all) bundle or for the mea bundle, to prepare the other Maximo Manage server bundles for the JMS queues, complete the following steps:
a. In the Additional properties column for the server bundle, click View.
b. In the Additional server config section, specify features for both the default queues and the custom queues that you want to add, as shown in the following example:
a. In the Additional properties column for the server bundle, click View.
b. In the Additional server config section, specify features for both the default queues and the custom queues that you want to add, as shown in the following example:
<?xml version='1.0' encoding='UTF-8'?>
<server description="new server">
<featureManager>
<feature>jndi-1.0</feature>
<feature>wasJmsClient-2.0</feature>
<feature>jmsMdb-3.2</feature>
<feature>mdb-3.2</feature>
</featureManager>

    <jmsQueueConnectionFactory jndiName="jms/maximo/int/cf/intcf" connectionManagerRef="mifjmsconfact"><properties.wasJms remoteServerAddress="<InstancesId>-<workspaceId>-<serverbundlename>.mas-<instanceId>-manage.svc:7276:BootstrapBasicMessaging"/></jmsQueueConnectionFactory>
    <connectionManager id="mifjmsconfact" maxPoolSize="20"/>

    <jmsQueue jndiName="jms/maximo/int/queues/sqout"><properties.wasJms queueName="sqoutbd"/></jmsQueue>
    <jmsQueue jndiName="jms/maximo/int/queues/sqin"><properties.wasJms queueName="sqinbd"/></jmsQueue>
    <jmsQueue jndiName="jms/maximo/int/queues/cqin"><properties.wasJms queueName="cqinbd"/></jmsQueue>
    <jmsQueue jndiName="jms/maximo/int/queues/cqinerr"><properties.wasJms queueName="cqinerrbd"/></jmsQueue>
    <jmsQueue jndiName="jms/maximo/int/queues/cqout"><properties.wasJms queueName="cqoutbd"/></jmsQueue>
    <jmsQueue jndiName="jms/maximo/int/queues/cqouterr"><properties.wasJms queueName="cqouterrbd"/></jmsQueue>
    <jmsQueue jndiName="jms/maximo/int/queues/notf"><properties.wasJms queueName="notfbd"/></jmsQueue>
    <jmsQueue jndiName="jms/maximo/int/queues/notferr"><properties.wasJms queueName="notferrbd"/></jmsQueue>


    <jmsActivationSpec id="maximo-all/mboejb/JMSContQueueProcessor-1" maxEndpoints="5"><properties.wasJms destinationLookup="jms/maximo/int/queues/cqin" maxConcurrency="5" maxBatchSize="20" connectionFactoryLookup="jms/maximo/int/cf/intcf"/></jmsActivationSpec>
    <jmsActivationSpec id="maximo-all/mboejb/JMSContQueueProcessor-2" maxEndpoints="1"><properties.wasJms destinationLookup="jms/maximo/int/queues/cqinerr" maxConcurrency="1" maxBatchSize="20" connectionFactoryLookup="jms/maximo/int/cf/intcf"/></jmsActivationSpec>
    <jmsActivationSpec id="maximo-all/mboejb/JMSContOutQueueProcessor-1" maxEndpoints="5"><properties.wasJms destinationLookup="jms/maximo/int/queues/cqout" maxConcurrency="5" maxBatchSize="20" connectionFactoryLookup="jms/maximo/int/cf/intcf"/></jmsActivationSpec>
    <jmsActivationSpec id="maximo-all/mboejb/JMSContOutQueueProcessor-2" maxEndpoints="1"><properties.wasJms destinationLookup="jms/maximo/int/queues/cqouterr" maxConcurrency="1" maxBatchSize="20" connectionFactoryLookup="jms/maximo/int/cf/intcf"/></jmsActivationSpec>
</server>
The queueName values must match the queue names that you specified in step 8.c. Also, the difference between all bundles or mea bundle XML versus the report, cron, UI bundles XML is that the second category does not have the jmsActivationSpec lines.
The ID used in jmsActivationSpec is "maximo-all/mboejb/JMSContQueueProcessor-1". Where maximo-all is the ear file name.
For mea you need to use maximomea like: "maximomea/mboejb/JMSContQueueProcessor-1"
When you enter the connection properties, on remoteServerAddress supply the following variables:
- Name of your JMS server bundle, for example, jmsserver.
- <InstanceId>
- Name of your Maximo Application Suite instance.
- <workspaceId>
- Name of your workspace.
- <serverbundlename>
- Note: Your remoteServerAddress must be in the following format:
- remoteServerAddress="<InstanceId>-<workspaceId>-<serverbundlename>.mas-<InstanceId>-manage.svc:7276:BootstrapBasicMessaging".
- For example:
- remoteServerAddress="mngrel84-masdev-jmsserver.mas-mngrel84-manage.svc:7276:BootstrapBasicMessaging".
- 10. If you have report, cron, or UI bundles, complete the following steps for each of them:
a. In the Additional properties column for the server bundle, click View.
b. In the Additional server config section, specify features for both the default queues and the custom queues that you want to add, as shown in the following example: <?xml version='1.0' encoding='UTF-8'?> <server description="new server"> <featureManager> <feature>jndi-1.0</feature> <feature>wasJmsClient-2.0</feature> <feature>jmsMdb-3.2</feature> <feature>mdb-3.2</feature> </featureManager> <jmsQueueConnectionFactory jndiName="jms/maximo/int/cf/intcf" connectionManagerRef="mifjmsconfact"><properties.wasJms remoteServerAddress="<InstanceId>-<workspaceId>-<serverbundlename>.mas-<InstanceId>-manage.svc:7276:BootstrapBasicMessaging"/></jmsQueueConnectionFactory> <connectionManager id="mifjmsconfact" maxPoolSize="20"/> <jmsQueue jndiName="jms/maximo/int/queues/sqout"><properties.wasJms queueName="sqoutbd"/></jmsQueue> <jmsQueue jndiName="jms/maximo/int/queues/sqin"><properties.wasJms queueName="sqinbd"/></jmsQueue> <jmsQueue jndiName="jms/maximo/int/queues/cqin"><properties.wasJms queueName="cqinbd"/></jmsQueue> <jmsQueue jndiName="jms/maximo/int/queues/cqinerr"><properties.wasJms queueName="cqinerrbd"/></jmsQueue> <jmsQueue jndiName="jms/maximo/int/queues/cqout"><properties.wasJms queueName="cqoutbd"/></jmsQueue> <jmsQueue jndiName="jms/maximo/int/queues/cqouterr"><properties.wasJms queueName="cqouterrbd"/></jmsQueue> <jmsQueue jndiName="jms/maximo/int/queues/notf"><properties.wasJms queueName="notfbd"/></jmsQueue> <jmsQueue jndiName="jms/maximo/int/queues/notferr"><properties.wasJms queueName="notferrbd"/></jmsQueue> </server>- Remember to update remoteServerAddress as well for bundles report, cron, or UI.
- 11. Click Save again to save the additional server bundle properties.
12. After you complete the workspace updates, activate the changes.
- Enabling MDBs
- After the queue is configured, you need to enable MDBs so the continuous queue can work.
- 1. Creating a customization file.
- a. Copy ejb-jar.xml file from maxinst pod in your local machine.
oc rsync MAXIST_POD_NAME:/opt/IBM/SMP/maximo/applications/maximo/mboejb/ejbmodule/META-INF/ejb-jar.xml ./Do not copy ibm-ejb-jar-bnd.xmi. You need ejb-jar file only if you include ibm-ejb-jar-bnd.xmi in the customization file MDB will not work.b. Uncomment the sections in ejb-jar.xml file: "MEA MDB" and "MEA MDB for error queue".If you want to use a continuous outbound queue and don't have a reference for JMSContOutQueueProcessor-1 and JMSContOutQueueProcessor-2 in your ejb-jar file include the TAGs:<!-- MEA MDB FOR CQOUT --> <message-driven id="MessageDriven_JMSContOutQueueProcessor_1"> <ejb-name>JMSContOutQueueProcessor-1</ejb-name> <ejb-class>psdi.iface.jms.JMSContQueueProcessor</ejb-class> <transaction-type>Container</transaction-type> <message-destination-type>javax.jms.Queue</message-destination-type> <env-entry> <env-entry-name>MESSAGEPROCESSOR</env-entry-name> <env-entry-type>java.lang.String </env-entry-type> <env-entry-value>psdi.iface.jms.QueueToMaximoProcessor</env-entry-value> </env-entry> </message-driven> <!-- MEA MDB for CQOUT error queue--> <message-driven id="MessageDriven_JMSContOutQueueProcessor_2"> <ejb-name>JMSContOutQueueProcessor-2</ejb-name> <ejb-class>psdi.iface.jms.JMSContQueueProcessor</ejb-class> <transaction-type>Container</transaction-type> <message-destination-type>javax.jms.Queue</message-destination-type> <env-entry> <env-entry-name>MESSAGEPROCESSOR</env-entry-name> <env-entry-type>java.lang.String </env-entry-type> <env-entry-value>psdi.iface.jms.QueueToMaximoProcessor</env-entry-value> </env-entry> <env-entry> <env-entry-name>MDBDELAY</env-entry-name> <env-entry-type>java.lang.Long </env-entry-type> <env-entry-value>30000</env-entry-value> </env-entry> <env-entry> <env-entry-name>ERRORQUEUE</env-entry-name> <env-entry-type>java.lang.String </env-entry-type> <env-entry-value>1</env-entry-value> </env-entry> </message-driven> <!-- MEA MDB FOR CQOUT --> <container-transaction> <method> <ejb-name>JMSContOutQueueProcessor-1</ejb-name> <method-name>*</method-name> </method> <trans-attribute>Required</trans-attribute> </container-transaction> <!-- MEA MDB for CQOUT error queue--> <container-transaction> <method> <ejb-name>JMSContOutQueueProcessor-2</ejb-name> <method-name>*</method-name> </method> <trans-attribute>Required</trans-attribute> </container-transaction>c. Create in your local machine the path:deployment\was-liberty-default\config-deployment-descriptors\maximo-all\mboejb\ejbmodule\META-INF\ejb-jar.xmlIn this path, there is a reference to the bundle type, which in this example is maximo-all. Replace by maximo-mea if you are enabling for mea bundle. The customization file uses the same path that exists in the maxinst pod, like this example: d. Create a zip file with the entire path created in step 1.c.2. Upload the customization zip file to an FTP or HTTP server.3. Log in to Maximo Application Suite as a system administrator.
4. From Suite administration, select workspaces from the side navigation menu and then select the Manage tile.
5. On the Manage workspace details page, click Actions, and select Update configuration.6. In the Customization row, clear the System Managed checkbox. Click Add customization archive.7. In the Alias column, enter a name for the customization file, such as JMS. In the File address column, paste the URL for the customization file uploaded in step 2.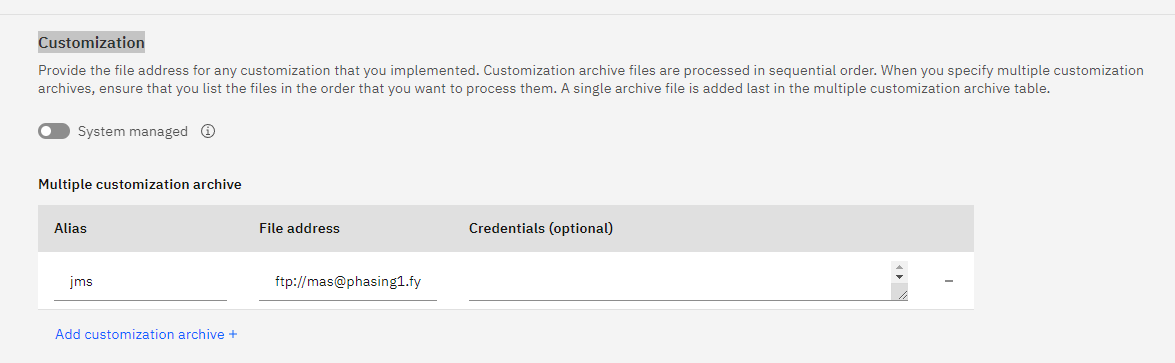 8. Click Activate button and wait for the environment to reconcile.
- Reference Link:https://www.ibm.com/support/pages/node/6962441

No comments:
Post a Comment