Steps
2.) Select Manage application tile under Applications tab
3.) From Actions button on upper right select Update configuration option
Add the dialog from Library to the SR and WOTRACK application.
We can now use this Feature Service and follow the steps below:
1) In the Map Manager application, create a new Map (or open an existing map)
2) Select the Map Provider (Maximo Spatial)
3) Select the Site that will be used for the Map. You can choose to set the Initial and Full extents
It should look similar to the image below:

Now we can prepare the Map Service:
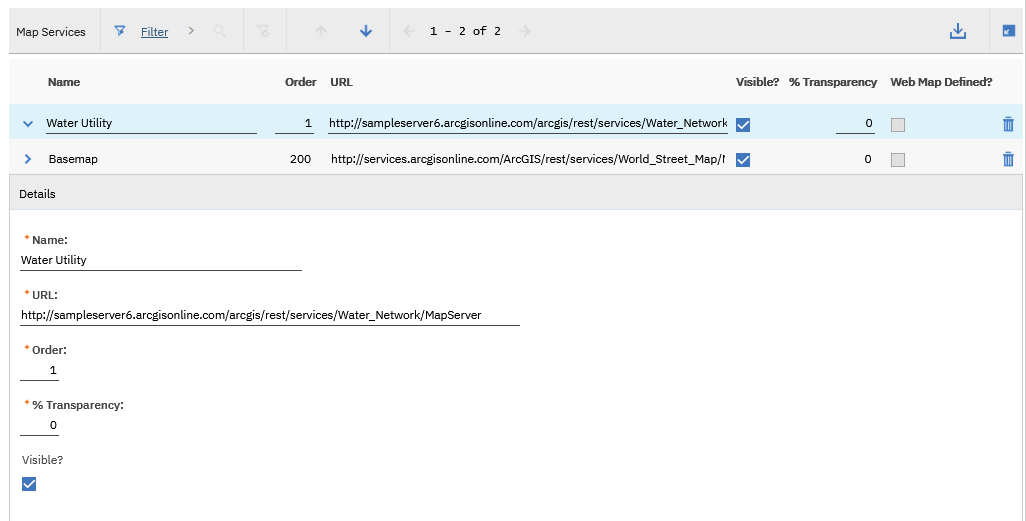
1) In the Map Services section, create a new row
2) Enter a name, and in the URL field, paste the feature service referenced above
3) Enter Order: 1 and set the Map to be visible.
This should look like the following:
Now let's create the GIS Objects!
1) In the Service layers, click "Select Layers"
2) Select the Layer you are going to use as a Service layer. (Water Hydrants for example)
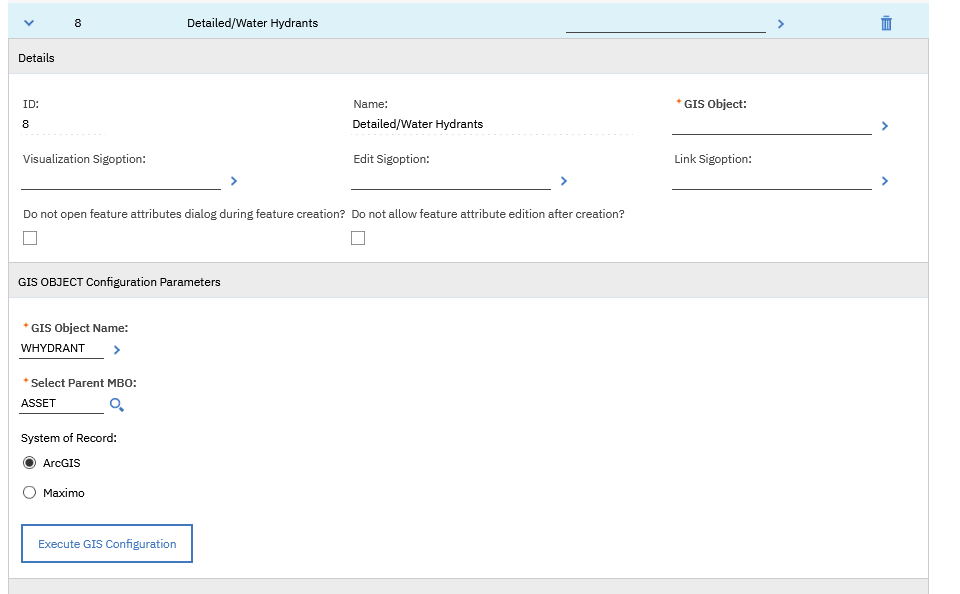
3) Open the details of the Service layer you've added, and you should see a few required fields
4) In the "GIS Object Name", specify a name for the GIS Objects you'll create. Eg: WHYDRANT
5) Select the Parent MBO this object will be associated to (assets, location etc). In this case, select asset.
Notice that the System of Record is automatically chosen. For Assets, Locations, and Service addresses the system of record is usually ArcGIS. Workorders and SRs are usually Maximo.
This should look like the following:
6) And Finally, click the "Execute GIS Configuration"
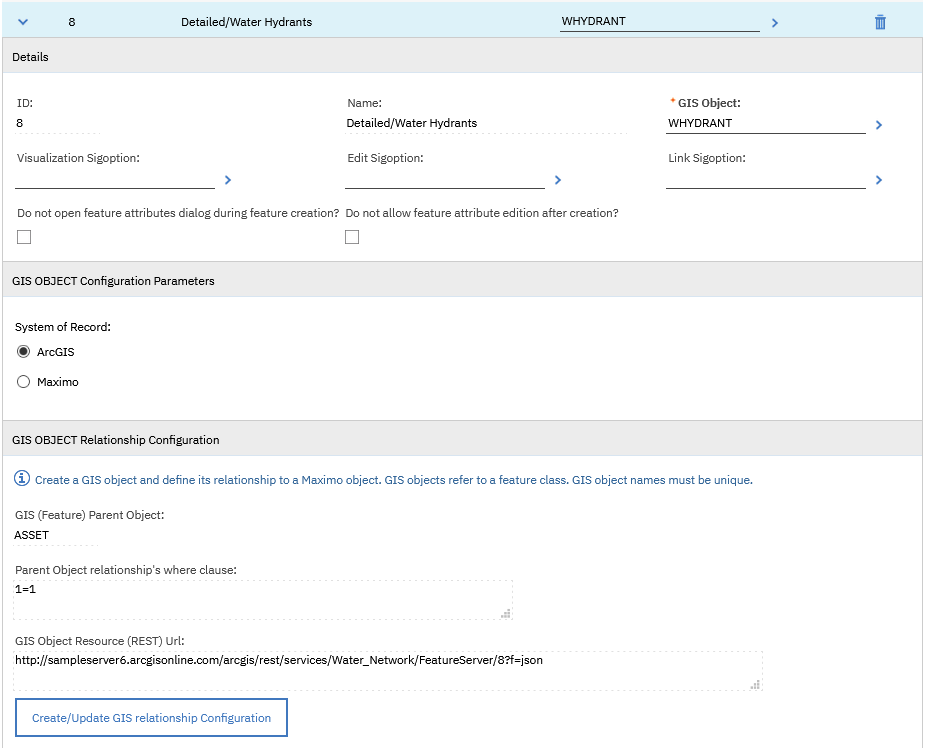
Notice a page with Select Attributes appears. Select the Attributes that you would like to display and then click OK. This will now create the Object
This should look like the following:
Now, let's define it's relationship to the Maximo Object and our Identifier will be the FacilitiesID
1) Go to the DB Configuration application
2) Search for, and bring up Assets object
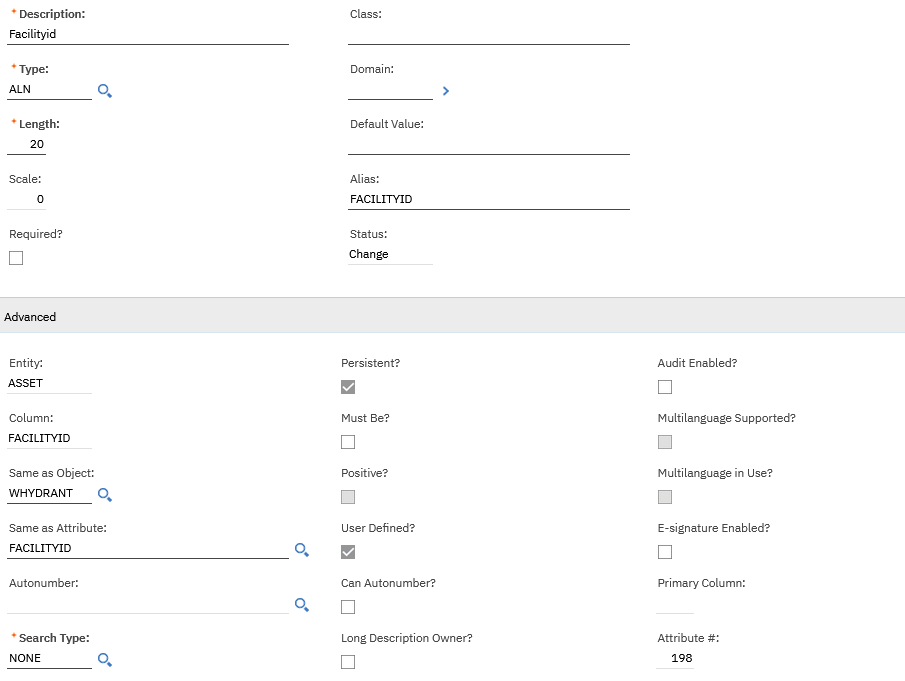
3) On the attributes, click new row
4) In the "Same as Object", select the WHYDRANT we've created and "Same as Attribute" as FACILITYID
This should look like the following:
Save the Record, and apply the configuration changes to the DB
Finally, let's go back to the Map Manager application. In the Service layers, click the "create/update GIS relationship configuration" and then "new row" button
Add the Attributes as follows and then click OK:
This should look like the following:
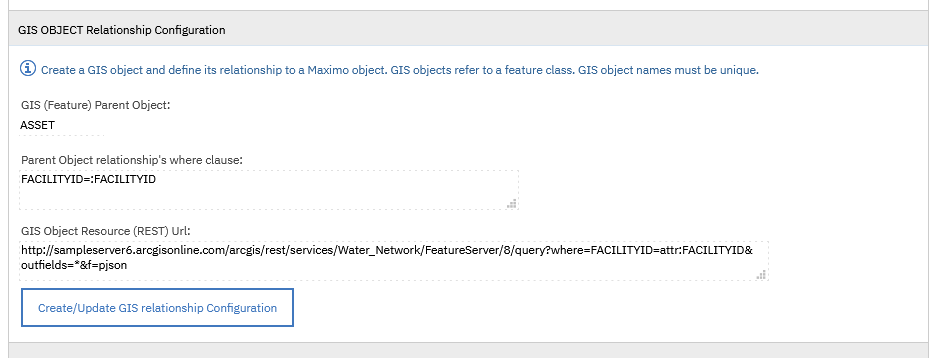
And That's it! Your feature object is now created and configured
Reference Link : https://www.ibm.com/support/pages/getting-started-maximo-spatial-76-creating-gis-objects
Reference Link:
https://developer.ibm.com/apis/catalog/maximo--maximo-application-suite-admin-apis-9-0-x/api/API--maximo--sso-configuration#getSSOConfig
On Windows system, when you select a task that requires a server restart in Administration Services UI, and run that task, the task executes and the message 'Restarting DASH server. This might take a few minutes' is displayed. However, when you refresh Administration Services UI, the message 'Unable to connect to server' is displayed. The logs contain the following error messages: [3/14/13 11:30:15:404 IST] 00000001 TCPPort E TCPC0003E: TCP Channel TCP_2 initialization failed. The socket bind failed for host * and port 16310. The port may already be in use. [3/14/13 11:30:15:405 IST] 00000001 WSChannelFram E CHFW0034W: The Transport Channel Service detected transport chain HttpQueueInboundDefault failed. The service will retry to start chain HttpQueueInboundDefault every 5000 milliseconds for up to 60 attempts. [3/14/13 11:30:17:422 IST] 00000001 TCPPort E TCPC0003E: TCP Channel TCP_4 initialization failed. The socket bind failed for host * and port 16311. The port may already be in use. [3/14/13 11:30:17:423 IST] 00000001 WSChannelFram E CHFW0034W: The Transport Channel Service detected transport chain HttpQueueInboundDefaultSecure failed. The service will retry to start chain HttpQueueInboundDefaultSecure every 5000 milliseconds for up to 60 attempts. [3/14/13 11:30:19:436 IST] 00000001 TCPPort E TCPC0003E: TCP Channel TCP_3 initialization failed. The socket bind failed for host * and port 16316. The port may already be in use. [3/14/13 11:30:19:437 IST] 00000001 WSChannelFram E CHFW0034W: The Transport Channel Service detected transport chain WCInboundAdminSecure failed. The service will retry to start chain WCInboundAdminSecure every 5000 milliseconds for up to 60 attempts. [3/14/13 11:30:22:447 IST] 00000001 TCPPort E TCPC0003E: TCP Channel TCP_4 initialization failed. The socket bind failed for host * and port 16311. The port may already be in use. [3/14/13 11:30:22:448 IST] 00000001 WSChannelFram E CHFW0034W: The Transport Channel Service detected transport chain WCInboundDefaultSecure failed. The service will retry to start chain WCInboundDefaultSecure every 5000 milliseconds for up to 60 attempts. [3/14/13 11:30:25:496 IST] 00000001 TCPPort E TCPC0003E: TCP Channel TCP_1 initialization failed. The socket bind failed for host * and port 16315. The port may already be in use. [3/14/13 11:30:25:496 IST] 00000001 WSChannelFram E CHFW0034W: The Transport Channel Service detected transport chain SOAPAcceptorChain1 failed. The service will retry to start chain SOAPAcceptorChain1 every 5000 milliseconds for up to 60 attempts. [3/14/13 11:30:28:504 IST] 00000001 TCPPort E TCPC0003E: TCP Channel TCP_4 initialization failed. The socket bind failed for host * and port 16311. The port may already be in use. [3/14/13 11:30:28:505 IST] 00000001 WSChannelFram E CHFW0034W: The Transport Channel Service detected transport chain SOAPAcceptorChain2 failed. The service will retry to start chain SOAPAcceptorChain2 every 5000 milliseconds for up to 60 attempts.
To set this property for WebSphere Application Server:
1. Open the file setupCmdLine.bat in the <WAS_HOME>/bin/ directory.
2. Add the following line to the file:
SET IBM_JAVA_OPTIONS="-Djava.net.preferIPv4Stack=true"
3. Save the file and restart the application server.
This ensures that IPv4 is used for communication.
Reference Link : https://www.ibm.com/support/pages/error-unable-connect-server-displayed-when-you-run-task-prompts-server-restart
New fix pack numbering was introduced starting 16.0.0.2. Fix pack 16.0.0.2 for WebSphere Application Server Liberty is the first of a series of common Liberty levels that apply to both Version 8.5 and Version 9.0 of WebSphere Application Server on all supported platforms.
Reference Link :
https://www.ibm.com/support/pages/node/715557#24007
You can check the OC by running the instructions listed below.
#login with admin user
oc login https://<master-server>:8443 -u admin -p redhat
#login as developer user
oc login https://<master-server>:8443 -u developer -p developer
#Logged in username
oc whoami
#Create a new app from a GitHub Repository
oc new-app https://github.com/chetantiwary/example-app
#New app from a different branch
oc new-app --name=web nginx:1.10~https://github.com/chetantiwaryxxxx#mybranch
#Create objects from a file:
oc create -f anyobject.yaml -n <project>
Eg. oc create -f service.yaml -n operation
#Delete objects contained in a file:
oc delete -f anyobject.yaml -n <project>
#Create or merge objects from file
oc apply -f anyobject.yaml -n <project>
#Monitor Pod status
watch oc get pods
#Gather information of a pod deployment with more details
oc get pods -o wide
#do not show inactive Pods
oc get pods --show-all=false
#show all resources
oc get all
oc get pods
oc get service
oc get route
oc get secrets
oc get configmap
oc get limitranges
oc get resourcequota
oc get hpa dc/dcname
oc get pv
oc get pvc
oc get nodes
oc get ingress
oc get networkpolicy
#Get Openshift Console Address
oc whoami –show-console
#Copy a local folder to app Pod under the folder /opt/jboss
oc cp ./file app:/opt/jboss
#Create a ConfigMap from file
oc create configmap my-config --from-file=config.properties
oc create secret generic my-secret --from-file=secret.key
#Create a ConfigMap/Secret from literals
oc create configmap my-config --from-literal=foo=bar --from-literal=app=blu
oc create secret generic my-secret --from-literal=secret.key=value
#Set a ConfigMap/Secret in a deployment
oc set env deployment/my-deployment --from configmap/my-config
oc set env deployment/my-deployment --from secret/my-secret
# Update deployment green with a new environment variable
oc set env dc/green STORAGE_DIR=/local
# List the environment variables defined on all pods
oc set env pods --all --list
# Import environment from a secret
oc set env --from=secret/mysecret dc/myapp
#Get Nodes list
oc get nodes
#Check on which Node your Pods are running
oc get pods -o wide
#List all pods which are running on a Node
oc adm manage-node node1.fqdn --list-pods ( fqdn = fully qualified domain name)
#Add a label to a Node
oc label node node1.fqdn label=value
#Remove a label from a Node
oc label node node1.fqdn label-
#create a PersistentVolumeClaim
oc set volume dc/<dcname> --add --name=shared-storage \
-t pvc --claim-mode=ReadWriteMany --claim-size=1Gi \
--claim-name=shared-storage --claim-class=ocs-storagecluster-cephfs \
--mount-path=/opt/app-root/src/uploaded \
-n shared-storage
#Manual deployment
$ oc rollout latest <dcname>
#Pause automatic deployment rollout
oc rollout pause dc <dcname>
# Resume automatic deployment rollout
oc rollout resume dc <dcname>
#Define resource requests and limits in DeploymentConfig
oc set resources deployment nginx --limits=cpu=200m,memory=512Mi --requests=cpu=100m,memory=256Mi
#Define livenessProve and readinessProve in DeploymentConfig
oc set probe dc/nginx --readiness --get-url=http://:8080/healthz --initial-delay-seconds=10
oc set probe dc/nginx --liveness --get-url=http://:8080/healthz --initial-delay-seconds=10
#Scale the number of Pods to 5
oc scale dc/nginx --replicas=5
#Define Horizontal Pod Autoscaler (hpa)
oc autoscale dc nginx --max=4 –min=2 --cpu-percent=60
#Create route with default hostname
oc expose service <servicename>
# Create Route and expose it through a custom Hostname
oc expose service <servicename> --hostname <hostname>
#Read the Route Host attribute
oc get route my-route -o jsonpath --template="{.spec.host}"
Or
oc get route -n <project/namespace>
#Common Troubleshooting
oc delete all -l key=value
oc get all
oc describe pod <pod-name>
oc describe node <node-name>
oc get nodes -L <label>
oc label node <node-name> key=value
oc get endpoints -n <namespace/project>
oc describe node <node-name> | grep -i taint
oc get events
oc get dc <dc-name> -o yaml
oc rollout latest hello
oc logs <hello-2-abcd>
oc expose service hello --hostname=hello.apps.lab.example.com
oc debug pod <PODNAME>
oc edit service <service-name>
oc edit deployment <deploymentname>
oc edit ingress <ingressname>
oc edit route <routename>
oc adm cordon <nodename> ( to mark the node unschedulable )
Reference Link : https://learn.redhat.com/t5/DO280-Red-Hat-OpenShift/OpenShift-commands-Cheat-Sheet/td-p/35371
Steps In order to increase the file store size we need to update the server.xml for the jmsserver bundle. The server.xml is added in ...